| [Top] | [Contents] | [Index] | [ ? ] |
Copyright (C) 2000-2014 Shanghai Shifang Software, Inc.
The document is available at http://webdocs.cs.ualberta.ca/~yuan/databases/rubatodb/docs/rubatodb.html
| [ < ] | [ > ] | [ << ] | [ Up ] | [ >> ] | [Top] | [Contents] | [Index] | [ ? ] |
RubatoDB is a highly scalable NewSQL system, supporting various consistency levels from ACID to BASE for OLTP, OLAP, and big data applications, implemented based the following state-of-art technologies.
It is these two new features that enable RubatoDB to be a NewSQL system with the outstanding performance as demonstrated in Performance. The underline architecture and the new distributed concurrency control protocol of RubatoDB are published in the top-tier database conferences and journals ([1], [2], [3], [4]).
RubatoDB enjoys the following distinguished features
standard SQL facilities with the ACID properties.
commodity servers and/or virtual machinese, with or without distributed storage systems.
deployed in the cloud, without using any dedicated storage systems.
data replication for fast and accurate recovery in the event of failure.
MySQL communication protocol which enables our users to use various application tools, including the JDBC, ODBC, .Net, the MySQL interactive tool, and many MySQL graphics tools, such as MySQL Workbench: Administrator.
| [ < ] | [ > ] | [ << ] | [ Up ] | [ >> ] | [Top] | [Contents] | [Index] | [ ? ] |
Since RubatoDB adapts MySQL communication protocol and its SQL facilities, this chapter focuses on the distinct new features of RubatoDB, such as how to create databases and tables distributed over a list of grid nodes, and how to use the standard SQL statements to retrieve information over a list of distributed tables.
Note that a RubatoDB server runs on a list of N, where N >= 1, shared-nothing grid nodes (or grid for short) in which each grid is identified by its grid id which is a positive integer less than N. If a replication factor is 3, then each grid group (or grid for short) consists of 3 nodes, one master node and two slave nodes. Therefore, each node can be identified by, saying <2,0>, where 2 standing for the grid id and 0 for the replication id respectively.
It is not difficult to see that in our SQL facilities, the grid and replication IDs are transparent to all the SQL statements, except some of the data definition statements, such as CREATE DATABASE and/or CREATE TABLE statements.
| 2.1 Create Database Statement | ||
| 2.2 Create Table Statement and Table Partition | ||
| 2.3 Data Types | ||
| 2.4 SQL Commands | ||
| 2.5 Create Sequence | ||
| 2.6 Special Considerations | ||
| 2.7 Tutorials |
| [ < ] | [ > ] | [ << ] | [ Up ] | [ >> ] | [Top] | [Contents] | [Index] | [ ? ] |
Obviously, one has to create a database before any tables can be created.
RubatoDB is designed to run on a set of (shared nothing) grid nodes, and thus
a Create Database Statement must specify a list of grid nodes on which the database
will be stored.
The create database statement is formally specified as below.
CREATE DATABASE STATEMENT::=

CREATE DATABASE database_name
   [DISTRIBUTED INTO {list_of_nodes | ALL NODES}]

list_of_nodes::= (0,  N1, N2, ..., Nn)

Note that 0,N1,...,Nn are a list of distinct integers that must
contain 0.
|
A Create Database statement is used to create a RubatoDB database
that will be stored over the given list of grid nodes.
If the Distributed clause is not specified, the database will be
stored at grid node 0, (or grid 0 for short).
Example 1. The following example demonstrates how to create a database distributed into a list of grids.
mysql> CREATE DATABASE my_db DISTRIBUTED INTO (0,1,2,3); Query OK, 0 rows affected (0.01 sec) mysql> CREATE DATABASE my_db2 DISTRIBUTED INTO (0,2,5); ERROR 9068 (HY108): Some grid(s) of the database not available now mysql> CREATE DATABASE my_db3 DISTRIBUTED INTO (1,1); ERROR 1064 (42000): The grid list of the database is not unique mysql> CREATE DATABASE my_db DISTRIBUTED INTO (1); ERROR 1064 (42000): The grid list must contain Grid 0 |
Note that the Create database statement will return an error message if
(1) any node id, (i.e., an integer in list_of_nodes) is not available or
not configured; (2) the node list specified is not unique; or (3) the node list does
not contain grid 0.
RubatoDB creates a database named definition_schema containing the list of meta data tables, including
table schemata to store all the information for databases created by either the system or the users.
Note that even though the definition_schema database is created on Grid 0, but the information is stored at all the grid nodes.
A simple SQL query can be used to find out all database created so far.
Example 2. The following queries shows the list of databases in the server before and after a database is created.
mysql> select * from definition_schema.schemata; +--------------+--------------------+--------------+-------------+---------------------+----------+---------------+ | catalog_name | schema_name | schema_owner | schemata_id | date_created | no_grids | list_of_grids | +--------------+--------------------+--------------+-------------+---------------------+----------+---------------+ | def | definition_schema | root | 10 | 2020-11-30 21:21:09 | 1 | 0, | | def | information_schema | root | 11 | 2020-11-30 21:21:09 | 1 | 0, | | def | mysql | root | 13 | 2020-11-30 21:21:09 | 1 | 0, | | def | performance_schema | root | 12 | 2020-11-30 21:21:09 | 1 | 0, | | def | sys | root | 12 | 2020-11-30 21:21:09 | 1 | 0, | +--------------+--------------------+--------------+-------------+---------------------+----------+---------------+ 5 rows in set (0.01 sec) mysql> CREATE DATABASE my_db DISTRIBUTED INTO (0,1); Query OK, 0 rows affected (0.05 sec) mysql> select * from definition_schema.schemata; +--------------+--------------------+--------------+-------------+---------------------+----------+---------------+ | catalog_name | schema_name | schema_owner | schemata_id | date_created | no_grids | list_of_grids | +--------------+--------------------+--------------+-------------+---------------------+----------+---------------+ | def | definition_schema | root | 10 | 2020-11-30 21:21:09 | 1 | 0, | | def | information_schema | root | 11 | 2020-11-30 21:21:09 | 1 | 0, | | def | my_db | my_db | 14 | 2020-11-30 21:52:02 | 2 | 0,1, | | def | mysql | root | 13 | 2020-11-30 21:21:09 | 1 | 0, | | def | performance_schema | root | 12 | 2020-11-30 21:21:09 | 1 | 0, | | def | sys | root | 12 | 2020-11-30 21:21:09 | 1 | 0, | +--------------+--------------------+--------------+-------------+---------------------+----------+---------------+ 6 rows in set (0.01 sec) |
The first table shows all five (5) system created databases. The first row, definition_schema, is created to store all RubatoDB meta tables, and the rest four databases serve the same purposes as those in the MySQL system. Note that all the meta tables of the definition_schema are available at each and every grid node.
The second table shows that a new database named my_db is distributed over two grids (0, 1).
| [ < ] | [ > ] | [ << ] | [ Up ] | [ >> ] | [Top] | [Contents] | [Index] | [ ? ] |
RubatoDB is designed to run on a set of (shared nothing) grid nodes This subsection describes how to create a table that is stored over a collection of nodes using various partition clauses.
RubatoDB supports three types of tables:
CREATE TABLE statement
CREATE TEMPORARY TABLE statement.
CREATE TABLE STATEMENT::=
CREATE [TEMPORARY] TABLE table_name
(create_definition)
[table_option]
[partition_options]
[grid_partitions]
[cache_size_specification]
CREATE [TEMPORARY] TABLE table_name
[(create_definition)]
[partition_options]
select_statement
[grid_partitions]
[cache_size_specification]
create_definition: the standard table-create clause of the form:
(col_name type, ..., col_name type, ...)
table_option:
[...]
| ENGINE [=] engine_name
partition_options:
PARTITION BY
{[LINEAR] HASH (expr)}
| [LINEAR] KEY [ALGORITH={1|2}] (column_list)
| RANGE{(expr)|COLUMNS(column_list)}
| LIST{(expr)|COLUMNS(column_list)}
[PARTITIONS num]
[SUBPARTITION BY
{ [LINEAR] HASH(expr) }
| [LINEAR] KEY [ALGORITHM={1|2}] (column_list) }
[SUBPARTITIONS num]
]
[(partition_definition [, partition_definition] ...)]
partition_definition:
PARTITION partition_name
[VALUES
{LESS THAN {(expr | value_list) | MAXVALUE}
|
IN (value_list)}]
[[STORAGE] ENGINE [=] engine_name]
[COMMENT [=] 'comment_text' ]
[DATA DIRECTORY [=] 'data_dir']
[INDEX DIRECTORY [=] 'index_dir']
[MAX_ROWS [=] max_number_of_rows]
[MIN_ROWS [=] min_number_of_rows]
[TABLESPACE [=] tablespace_name]
[NODEGROUP [=] node_group_id]
[(subpartition_definition [, subpartition_definition] ...)]
subpartition_definition:
SUBPARTITION logical_name
[[STORAGE] ENGINE [=] engine_name]
[COMMENT [=] 'comment_text' ]
[DATA DIRECTORY [=] 'data_dir']
[INDEX DIRECTORY [=] 'index_dir']
[MAX_ROWS [=] max_number_of_rows]
[MIN_ROWS [=] min_number_of_rows]
[TABLESPACE [=] tablespace_name]
[NODEGROUP [=] node_group_id]
select_statement:
SELECT ... (Some valid select statement)
grid_partitions:
{PARTITION BY GRID (column_name) TO N NODES WITH mod (N)}
|{PARTITION BY GRID (column_name) TO N NODES INTO |
Please note that
grid_partition
must be a subset of the list of grid nodes of the database of the stable.
Example 3.
The following example demos how to create regular and temporary tables
using the SELECT statement.
(See table.sql in the tests directory of the installation directory.)
mysql> CREATE TABLE base_table(
         t1 int primary key,
         t2 varchar(100),
         t3 int
       ) PARTITION BY GRID (t1) TO 2 NODES WITH  mod (2);
Query OK

mysql> insert into base_table values(10, 'just do it', 100);
Query OK, 1 row affected (0.05 sec)

mysql> insert into base_table values(11, 'yes we can', 101);
Query OK, 1 row affected (0.00 sec)

mysql> insert into base_table values(20, 'just say no', 201);
Query OK, 1 row affected (0.00 sec)

mysql> insert into base_table values(21, 'be cool', 202);
Query OK, 1 row affected (0.00 sec)

mysql> select * from base_table;
+----+-------------+------+
| t1 | t2          | t3   |
+----+-------------+------+
| 10 | just do it  |  100 |
| 20 | just say no |  201 |
| 11 | yes we can  |  101 |
| 21 | be cool     |  202 |
+----+-------------+------+
4 rows in set (0.01 sec)

mysql> CREATE TABLE sample_db(
         t1 int,
         t2 varchar(100),
         t3 int
       ) SELECT * FROM base_table,
       PARTITION BY GRID (t1) TO 2 NODES WITH  mod (2);
Query OK, 0 rows affected (0.20 sec)

mysql>  SELECT * FROM sample_db;

+------+-------------+------+
| t1   | t2          | t3   |
+------+-------------+------+
|   10 | just do it  |  100 |
|   20 | just say no |  201 |
|   11 | yes we can  |  101 |
|   21 | be cool     |  202 |
+------+-------------+------+

mysql> CREATE TEMPORARY TABLE temp1 (
         t1 int,
         t2 varchar(100),
         t3 int
       ) SELECT * FROM base_table;


mysql> SELECT * FROM temp1;

+------+-------------+------+
| t1   | t2          | t3   |
+------+-------------+------+
|   10 | just do it  |  100 |
|   20 | just say no |  201 |
|   11 | yes we can  |  101 |
|   21 | be cool     |  202 |
+------+-------------+------+
4 rows in set (0.04 sec)

mysql> CREATE TEMPORARY TABLE temp2 (
         t1 int,
         t2 varchar(100)
       ) SELECT t1, t2 FROM base_table;
Query OK, 4 rows affected (0.05 sec)

mysql> SELECT * FROM temp2;

+------+-------------+
| t1   | t2          |
+------+-------------+
|   10 | just do it  |
|   20 | just say no |
|   11 | yes we can  |
|   21 | be cool     |
+------+-------------+
4 rows in set (0.05 sec)
|
Example 4. The following example demos how to create a table using both the hash partition, as specified in the partition_options, and the grid partitions.
create table warehouse ( w_id smallint, w_name varchar(10), w_street_1 varchar(20), w_street_2 varchar(20), w_city varchar(20), w_state varchar(2), w_zip varchar(9), w_tax tinyint, w_ytd integer, constraint warehouse_primary_key primary key ( w_id) ) PARTITION BY HASH (w_id) PARTITIONS 3, PARTITION BY GRID (w_id) TO 2 NODES WITH mod (2); |
Example 5. The following example demos how to create a table stored at a particular grid node.
create table item ( i_id integer, i_im_id integer, i_name varchar(24), i_price tinyint, i_data varchar(50), constraint item_primary_key primary key (i_id) ) stored at grid(1); |
The two tables in definition_schema, that is, definition_schema.tables and definition_schema.table_distribution, are used to store the main information about the table and its distribution, as shown below.
mysql> select * from definition_schema.tables where table_schema='sqltest'; +---------------+--------------+------------+------------+--------------+--------------+------------+-----------+ | table_catalog | table_schema | table_name | table_type | table_degree | is_updatable | cache_size | global_id | +---------------+--------------+------------+------------+--------------+--------------+------------+-----------+ | def | sqltest | base_table | table | 3 | updatable | 0 | 25 | | def | sqltest | item | table | 5 | no | 0 | 30 | | def | sqltest | sample_db | table | 3 | updatable | 0 | 26 | | def | sqltest | temp1 | table | 3 | updatable | 0 | 27 | | def | sqltest | temp2 | table | 2 | updatable | 0 | 28 | | def | sqltest | warehouse | table | 5 | updatable | 0 | 29 | +---------------+--------------+------------+------------+--------------+--------------+------------+-----------+ 6 rows in set (0.00 sec) mysql> select * from definition_schema.table_distribution; +---------------+--------------+------------+-------------+---------+---------------+-------------+------------+------------------+-----------------+ | table_catalog | table_schema | table_name | no_of_grids | grid_id | list_of_grids | grid_column | expression | second_parameter | third_parameter | +---------------+--------------+------------+-------------+---------+---------------+-------------+------------+------------------+-----------------+ | def | sqltest | base_table | 2 | -1 | 0,1, | t1 | mod | NULL | NULL | | def | sqltest | item | 1 | 1 | 1, | NULL | NULL | NULL | NULL | | def | sqltest | sample_db | 2 | -1 | 0,1, | t1 | mod | NULL | NULL | | def | sqltest | temp1 | 1 | 0 | 0, | NULL | NULL | NULL | NULL | | def | sqltest | temp2 | 1 | 0 | 0, | NULL | NULL | NULL | NULL | | def | sqltest | warehouse | 2 | -1 | 0,1, | w_id | mod | NULL | NULL | +---------------+--------------+------------+-------------+---------+---------------+-------------+------------+------------------+-----------------+ 6 rows in set (0.01 sec) |
| [ < ] | [ > ] | [ << ] | [ Up ] | [ >> ] | [Top] | [Contents] | [Index] | [ ? ] |
RubatoDB supports all the data types of MySQL, and thus just a few simple examples given below to demonstrate different data types supported by RubatoDB.
Example 6. Consider a table created and populated by the following statements.
mysql> create table students (sid char(10), sname varchar(100)); Query OK, 0 rows affected (0.16 sec) mysql> insert into students values( '1234567890', 'Sarah'); Query OK, 1 row affected (0.05 sec) mysql> insert into students values( '12345', 'Tom'); Query OK, 1 row affected (0.01 sec) |
Please note that the three queries below lead to different result tables.
mysql> select * from students; +------------+-------+ | sid | sname | +------------+-------+ | 12345 | Tom | | 1234567890 | Sarah | +------------+-------+ 2 rows in set (0.00 sec) mysql> select * from students where sid = '12345 '; +-------+-------+ | sid | sname | +-------+-------+ | 12345 | Tom | +-------+-------+ 1 row in set (0.00 sec) mysql> select * from students where sid = '12345'; +-------+-------+ | sid | sname | +-------+-------+ | 12345 | Tom | +-------+-------+ 1 row in set (0.00 sec) |
Note that the last two queries returns the same result set even though different strings are used in the where clauses for comparison.
| [ < ] | [ > ] | [ << ] | [ Up ] | [ >> ] | [Top] | [Contents] | [Index] | [ ? ] |
BLOB/CLOB Datatype The LOB datatype BLOB, CLOB can store large and unstructured data such as text, image, video, and spatial data up to 2 gigabytes in size. The LOB access methods are based on the following facts.
PreparedStatement in JDBC to access lob values.
See Lob Operations for detailed examples to access Blob/Clob values.
Important Note about the lob size. The size limit on one BLOB/CLOB by RubatoDB is currently to 4Mb, though it can be recompiled up tp 2Gb.
| [ < ] | [ > ] | [ << ] | [ Up ] | [ >> ] | [Top] | [Contents] | [Index] | [ ? ] |
This section briefly describes RubatoDB commands and statements. All RubatoDB statements are classified into the following categories:
Since, except the CREATE DATABASE and CREATE TABLE
(DDL) statements, all other statements of RubatoDB
are the same as those of MySQL, we will discuss, in details,
the CREATE DATABASE and CREATE TABLE,
and use examples to demonstrate others.
| [ < ] | [ > ] | [ << ] | [ Up ] | [ >> ] | [Top] | [Contents] | [Index] | [ ? ] |
Data Definition Language (DDL) statements are used to perform the following tasks
| [ < ] | [ > ] | [ << ] | [ Up ] | [ >> ] | [Top] | [Contents] | [Index] | [ ? ] |
Data Manipulation Language (DML) statements are used to retrieve and update data stored in various database objects, including
| [ < ] | [ > ] | [ << ] | [ Up ] | [ >> ] | [Top] | [Contents] | [Index] | [ ? ] |
Transaction Control statements controls the execution of transactions. It contains the following SQL statements
| [ < ] | [ > ] | [ << ] | [ Up ] | [ >> ] | [Top] | [Contents] | [Index] | [ ? ] |
Example 7. Consider a database consisting of the following three tables:
student(sid, name, major, gpa) course(cid, title, description) registration(cid, sid, grade) select * from student; +-------+-------+----------+------+ | sid | name | major | gpa | +-------+-------+----------+------+ | 5500 | Susan | Law | NULL | | 12001 | Sarah | Math | NULL | | 12345 | Peter | NULL | NULL | | 54321 | Bob | Business | NULL | +-------+-------+----------+------+ select * from course; +-------+----------------------+-------------------------+ | cid | title | description | +-------+----------------------+-------------------------+ | AR100 | Cartoon Drawing | A comic book | | BS499 | Marketing | How to make quick bucks | | CS291 | Introduction to DBMS | first database course | | MA101 | Calculus | An easy course | +-------+----------------------+-------------------------+ select * from registration; +-------+-------+-------+ | cid | sid | grade | +-------+-------+-------+ | BS499 | 54321 | B | | CS291 | 12001 | NULL | | CS291 | 54321 | A | | MA101 | 12001 | D | +-------+-------+-------+ |
The script file for setting up the aformentioned running database is given below.
/*
 *  to set up the initial database for some examples
 */
DROP TABLE student;
DROP TABLE course;
DROP TABLE registration;

CREATE TABLE student (
	sid    INT,
        name   VARCHAR(64) NOT NULL,
	major  VARCHAR(10),
	gpa    NUMERIC(5, 2),
     	PRIMARY KEY(sid)
) partition by grid (sid) to 2 nodes with mod (2);

CREATE TABLE course (
        cid    CHAR(5),
        title  VARCHAR(64) NOT NULL,
        description VARCHAR(1024),
 	PRIMARY KEY(cid)
);

CREATE TABLE registration (
       cid     CHAR(5),
       sid     INT,
       grade     CHAR(1),
       PRIMARY KEY(cid, sid),
       CONSTRAINT sid_foreign_key
         FOREIGN KEY (sid) REFERENCES student(sid),
       CONSTRAINT grade_constraint
        CHECK ( grade IN ('A', 'B', 'C', 'D', 'F'))
);

INSERT INTO student (sid, name, major) VALUES (12001,'Sarah', 'Math');
INSERT INTO student (sid, name, major) VALUES (12345,'Peter', null);
INSERT INTO student (sid, name, major) VALUES (54321,'Bob', 'Business');
INSERT INTO student (sid, name, major) VALUES (5500, 'Susan', 'Law');

INSERT INTO course VALUES ('CS291','Introduction to DBMS','first database course');
INSERT INTO course VALUES ('MA101', 'Calculus', 'An easy course');
INSERT INTO course VALUES ('BS499', 'Marketing', 'How to make quick bucks');
INSERT INTO course VALUES ('AR100', 'Cartoon Drawing', 'A comic book');


INSERT INTO registration VALUES('CS291', 12001, null);
INSERT INTO registration VALUES('CS291', 54321, 'A');
INSERT INTO registration VALUES('MA101', 12001, 'D');
INSERT INTO registration VALUES('BS499', 54321, 'B');
|
| [ < ] | [ > ] | [ << ] | [ Up ] | [ >> ] | [Top] | [Contents] | [Index] | [ ? ] |
RubatoDB supports the standard SQL feature of Sequence.
A sequence is a database object from which multiple users may generate unique integers. One may use sequences to automatically generate primary key values.
CREATE SEQUENCE <sequence name>
[START WITH <{signed integer}>]
[INCREMENT BY <{signed integer}>]
[MINVALUE <{signed integer}>]
[MAXVALUE <{signed integer}>]
[CYCLE|NOCYLE]
|
Sequence numbers can be used to automatically generate unique primary key values for your data, and they can also be used to coordinate the keys across multiple rows or tables.
Values for a given sequence are automatically generated by RubatoDB routines, and only one sequence number can be generated at a time and sequences permit the simultaneous generation of multiple sequence numbers while guaranteeing that every sequence number is unique.
When a sequence number is generated, the sequence is incremented, independent of the transaction committing or rolling back. If two users concurrently increment the same sequence, the sequence numbers each user acquires may have gaps because sequence numbers are being generated by the other user. One user can never acquire the sequence number generated by another user. Once a sequence value is generated by one user, that user can continue to access that value regardless of whether the sequence is incremented by another user.
Sequence numbers are generated independently of tables, so the same sequence can be used for one or for multiple tables. It is possible that individual sequence numbers will appear to be skipped, because they were generated and used in a transaction that ultimately rolled back. Additionally, a single user may not realize that other users are drawing from the same sequence.
You can create a sequence so that its values increment in one of following ways:
To create a sequence that increments without bound, you shall not
specify the MAXVALUE parameter.
To create a sequence that increments to a predefined limit and then
restart, one must specify the CYCLE option.
Without specifying any option, you will create an ascending sequence that starts with 1 and increases by 1 with no upper limit. Specifying only INCREMENT BY -1 creates a descending sequence that starts with -1 and decreases with no lower limit.
Example 8.
mysql> CREATE SEQUENCE item_id START WITH 10 INCREMENT BY 2 MAXVALUE 2000000000; Query OK, 0 rows affected (0.01 sec) mysql> SELECT NEXTVAL FROM item_id; +---------+ | NEXTVAL | +---------+ | 12 | +---------+ 1 row in set (0.00 sec) mysql> SELECT NEXTVAL FROM item_id; +---------+ | NEXTVAL | +---------+ | 14 | +---------+ 1 row in set (0.00 sec) mysql> SELECT NEXTVAL FROM item_id; +---------+ | NEXTVAL | +---------+ | 16 | +---------+ 1 row in set (0.00 sec) |
The CREATE SEQUENCE statement will create a sequence named item_id and the SELECT
statement will return 10.
Note that the absolute value of MAXVALUE and MINVALUE cannot exceed
that of Long Integer.
A sequence can be dropped using the DROP SEQUENCE statement below.
DROP SEQUENCE <sequence name>
RubatoDB will commit the current transaction following the Create Sequence and/or drop sequence statement.
DROP SEQUENCE employee_id_sequence |
See Also: Create Sequence.
| [ < ] | [ > ] | [ << ] | [ Up ] | [ >> ] | [Top] | [Contents] | [Index] | [ ? ] |
This section we discuss some special considerations for RubatoDB, a distributed SQL database, including
| 2.6.1 Table Partition | ||
| 2.6.2 Constraints | ||
| 2.6.3 Stored Procedure | ||
| 2.6.4 Joins of Tables From Different Grids | ||
| 2.6.5 Base Node |
| [ < ] | [ > ] | [ << ] | [ Up ] | [ >> ] | [Top] | [Contents] | [Index] | [ ? ] |
RubatoDB supports various table partitions, including partition by column-name into any set of grids, partition by hash, key, and others. We intend to introduce column partitions in near future.
| [ < ] | [ > ] | [ << ] | [ Up ] | [ >> ] | [Top] | [Contents] | [Index] | [ ? ] |
RubatoDB supports all SQL constraints, though some constraints are valid only on specific grid nodes.
| [ < ] | [ > ] | [ << ] | [ Up ] | [ >> ] | [Top] | [Contents] | [Index] | [ ? ] |
A stored procedure is a set of SQL statements that can be stored in the database and can be called using the Call statement.
RubatoDB supports stored procedures, using the MySQL stored procedure syntax, with optional procedure distribution clause.
Unlike MySQL, RubatoDB does not support the INOUT parameters in stored procedures.
One important feature of the RubatoDB's stored procedure is that a stored procedure can be distributed over a set of grids and a procedure call can be directed into one or all grids on which a stored procedure is stored.
For the sake of distribution, RubatoDB adds one distribution clause at the end of the create-procedure statement as follows.
PROCEDURE DISTRIBUTION CLAUSE::= DISTRIBUTED [BY PARAMETER (parameter_name)] TO N NODES [WITH mod (N) | INTO (N1,N2,...,NN))] |
By this optional procedure distribution clause, a procedure can be dustrubyted in three different ways.
The stored procedure will only be stored in the source grid (i.e., grid 0).
DISTRIBUTED [BY PARAMETER (parameter_name)] TO N NODES WITH mod (N).
The stored procedure will be stored in N grids, that is, Grid 0, Grid 1, ..., Grid N-1.
DISTRIBUTED [BY PARAMETER (parameter_name)] TO N NODES INTO (N1, ..., NN).
The stored procedure will be stored in N grids, that is, into a list N of distinct grids.
If the optional subclause [BY PARAMETER (parameter_name)], where parameter_name is the name of an IN parameter, is specified,
then the CALL statement will be dispatched only to the grid according to the value of the input parameter of paramter_name.
Otherwise, the CALL statement will be dispatched to all the grids specified in the distribution clause.
See Example 14 for details.
| [ < ] | [ > ] | [ << ] | [ Up ] | [ >> ] | [Top] | [Contents] | [Index] | [ ? ] |
Because of inefficiency, RubatoDB does not support distributed joins, but we DO provide facilities for evaluating queries involving joins of tables distributed over a set of grids. See Example 10 for details.
| [ < ] | [ > ] | [ << ] | [ Up ] | [ >> ] | [Top] | [Contents] | [Index] | [ ? ] |
Each request to RubatoDB may query and update tables distributed over any number of grids and thus must use one grid to coordinate all tasks distributed over involving grids, including but not limiting to analyze the request, to dispatch sub-requests to different grids, and to combine all results of tasks to form one answer to the client. Such a grid is called a base node of a request.
If all requests of RubatoDB use the same grid as their base node, such a grid will certainly become bottleneck of the system. In order to facilitate load balance, RubatoDB provides a very simple but rather effective mechanism for a client of RubatoDB to specify any node as its base node using the following SQL statement.
SET BASE NODE 3; |
A client can change his/her base node any time, as long as it is NOT within an active transaction.
The default base node of any client will be the grid 0, that is the grid on which a server socket is located.
One of the basic principles of the base node mechanism is that the answer to any query of a client is independent on the base node used for the query.
| [ < ] | [ > ] | [ << ] | [ Up ] | [ >> ] | [Top] | [Contents] | [Index] | [ ? ] |
We are going to present various examples to demo how to use RubatoDB in this section.
Note that (1) one shall create a user, other than the default
user root, (2) all sample programs in this section are included in the
tests directory in the installation directory located in the file system of each and
every grid node; (3) most sample tables are distributed over two grid nodes, and (4) one shall create
a database distributed over at least two grid nodes.
| 2.7.1 Join and Nested Query | ||
| 2.7.2 Temporary Table for Joins | ||
| 2.7.3 Outer Join | ||
| 2.7.4 Loading | ||
| 2.7.5 Cursor | ||
| 2.6.3 Stored Procedure | ||
| 2.7.7 Trigger | ||
| 2.7.8 Lob Operations | ||
| 2.7.9 Transaction |
| [ < ] | [ > ] | [ << ] | [ Up ] | [ >> ] | [Top] | [Contents] | [Index] | [ ? ] |
Example 9. The following example demonstrates evaluations of
join and/or nested queries supported by RubatoDB.
(Note that the set of the given SQL statements are contained in RubatoDB/tests).
The database is created and populated by the following sequence of SQL statements.
create table Student (
     s_id int ,
     s_name varchar(64),
     address varchar(128),
     major varchar(32)
)
PARTITION BY GRID (s_id) TO 2 NODES WITH  mod (2);

create table Scholarship (
     s_id int ,
     scholarship varchar(64) ,
     amount int
)
PARTITION BY GRID (s_id) TO 2 NODES WITH  mod (2);

insert into Student values (101,'Peter','Edmonton','CS');
insert into Student values (102,'Sarah','Calgary','CS');
insert into Student values (103,'Tom','Edmonton','Math');
insert into Student values (104,'Michelle','Toronto','Math');
insert into Scholarship values (102,'Ruthford',3000);
insert into Scholarship values (103,'Ruthford',3000);
insert into Scholarship values (103,'NSERC',6000);
|
To find all students with their scholarship and amount, one can use the query:
mysql> SELECT s.s_id, s_name, scholarship,amount
       FROM   Student s, Scholarship p
       WHERE  s.s_id = p.s_id;

+------+--------+-------------+--------+
| s_id | s_name | scholarship | amount |
+------+--------+-------------+--------+
|  102 | Sarah  | Ruthford    |   3000 |
|  103 | Tom    | NSERC       |   6000 |
|  103 | Tom    | Ruthford    |   3000 |
+------+--------+-------------+--------+
3 rows in set (0.01 sec)
|
mysql> SELECT count(*)
       FROM   Student
       WHERE  s_id in (SELECT s_id FROM Scholarship );
+----------+
| count(*) |
+----------+
|        2 |
+----------+
1 row in set (0.01 sec)

mysql> SELECT *
       FROM   Student
       WHERE  s_id in (SELECT s_id FROM Scholarship where amount > 3000);
+------+--------+----------+-------+
| s_id | s_name | address  | major |
+------+--------+----------+-------+
|  103 | Tom    | Edmonton | Math  |
+------+--------+----------+-------+
1 row in set (0.04 sec)
|
Note RubatoDB does not support distributed joins at this moment, and thus all the nested queries are evaluated at individual grid nodes.
| [ < ] | [ > ] | [ << ] | [ Up ] | [ >> ] | [Top] | [Contents] | [Index] | [ ? ] |
Example 10.
Consider the above example. Assume one needs to find the
s_id and s_name of all the students whose total amount
of scholarship is larger than or equal to all other students.
Because joins of tables distributed over different grids, this query cannot be
evaluated correctly using a regular SQL queries. However, the
problem can be easily resolved by using a temporary table, as shown in
the example below.
CREATE TABLE Student (
         s_id int ,
         s_name varchar(64),
         address varchar(128),
         major varchar(32)
)
PARTITION BY GRID (s_id) TO 2 NODES WITH  mod (2);

CREATE TABLE Scholarship (
         s_id int ,
         scholarship varchar(64) ,
         amount int
)
PARTITION BY GRID (s_id) TO 2 NODES WITH  mod (2);

insert into Student values (101,'Peter','Edmonton','CS');
insert into Student values (102,'Sarah','Calgary','CS');
insert into Student values (103,'Tom','Edmonton','Math');
insert into Student values (104,'Michelle','Toronto','Math');
insert into Scholarship values (102,'Ruthford',3000);
insert into Scholarship values (103,'Ruthford',3000);
insert into Scholarship values (103,'NSERC',6000);
|
The two tables are given below:
+------+----------+----------+-------+ | s_id | s_name | address | major | +------+----------+----------+-------+ | 102 | Sarah | Calgary | CS | | 104 | Michelle | Toronto | Math | | 101 | Peter | Edmonton | CS | | 103 | Tom | Edmonton | Math | +------+----------+----------+-------+ +------+-------------+--------+ | s_id | scholarship | amount | +------+-------------+--------+ | 102 | Ruthford | 3000 | | 103 | NSERC | 6000 | | 103 | Ruthford | 3000 | +------+-------------+--------+ |
Consider a query to find the id and name of all the students with highest amount of scholarship. Even though, RubatoDB, does not support joins of two distributed tables, this query can be easily expressed using a temporary table, as shown below.
mysql> CREATE TEMPORARY TABLE temp (s_id int,s_name varchar(100),total int) stored at grid(0)
       SELECT s.s_id,s.s_name, sum(h.amount) as total
       FROM   student s, scholarship h
       WHERE  s.s_id = h.s_id
       GROUP BY s.s_id, s.s_name;
Query OK, 2 rows affected (0.00 sec)

mysql> SELECT s_id, s_name
       FROM   temp
       WHERE  total >= ALL (SELECT total FROM temp);

+------+--------+
| s_id | s_name |
+------+--------+
|  103 | Tom    |
+------+--------+
2 rows in set (0.00 sec)
|
Please note that (1) one has to drop temporary tables after uses, and (2) two temporary tables are used in this example because a temporary table cannot be used in both the main clause and the sub-query clause.
| [ < ] | [ > ] | [ << ] | [ Up ] | [ >> ] | [Top] | [Contents] | [Index] | [ ? ] |
Example 11. The following example shows how to use left/right/outer joins.
(All queries are contained in the SQL file rubatodb_dist/RubatoDB/tests/outer_join.sql.)
Consider the database with two tables created and populated by the following sequences of SQL statements.
create table Student (
    s_id int ,
    s_name varchar(64),
    address varchar(128),
    major varchar(32)
)
PARTITION BY GRID (s_id) TO 2 NODES WITH  mod (2);

create table Scholarship (
    s_id int ,
    scholarship varchar(64) ,
    amount int
)
PARTITION BY GRID (s_id) TO 2 NODES WITH  mod (2);

insert into Student values (101,'Peter','Edmonton','CS');
insert into Student values (102,'Sarah','Calgary','CS');
insert into Student values (103,'Tom','Edmonton','Math');
insert into Student values (104,'Michelle','Toronto','Math');
insert into Scholarship values (102,'Ruthford',3000);
insert into Scholarship values (103,'Ruthford',3000);
insert into Scholarship values (103,'NSERC',6000);
|
The various join queries and results are given below.
mysql> SELECT s.s_id, h.amount
       FROM   Student s left join Scholarship h on s.s_id=h.s_id;

+------+--------+
| s_id | amount |
+------+--------+
|  102 |   3000 |
|  104 |   NULL |
|  103 |   6000 |
|  103 |   3000 |
|  101 |   NULL |
+------+--------+
5 rows in set (0.00 sec)

mysql> SELECT s.s_id, sum(h.amount)
       FROM   Student s left join Scholarship h on s.s_id=h.s_id
       GROUP BY s.s_id;

+------+---------------+
| s_id | sum(h.amount) |
+------+---------------+
|  102 |          3000 |
|  104 |          NULL |
|  101 |          NULL |
|  103 |          9000 |
+------+---------------+
4 rows in set (0.00 sec)

mysql> SELECT s.s_id, h.amount
       FROM   Student s right join Scholarship h on s.s_id=h.s_id;

+------+--------+
| s_id | amount |
+------+--------+
|  102 |   3000 |
|  103 |   6000 |
|  103 |   3000 |
+------+--------+
3 rows in set (0.01 sec)


mysql> SELECT s.s_id, h.amount
       FROM   Student s inner join Scholarship h on s.s_id=h.s_id;

+------+--------+
| s_id | amount |
+------+--------+
|  102 |   3000 |
|  103 |   6000 |
|  103 |   3000 |
+------+--------+
3 rows in set (0.01 sec)
|
| [ < ] | [ > ] | [ << ] | [ Up ] | [ >> ] | [Top] | [Contents] | [Index] | [ ? ] |
The load data statement reads rows from a text file into a table at a very high speed. The text file, called Comma-Separated Value (CSV) file, can be read from the file system at any grid in the RubatoDB server, and its format can be specified by field and line separators.
The load data statement is formally specified as below.
LOAD [AT GRID <id number>] DATA INFILE 'file_name' [REPLACE | IGNORE] INTO TABLE table_name [FIELDS TERMINATED BY 'char'] [LINES TERMINATED BY 'char'] |
The default grid is Grid 0, and the default fields and lines separators are '\t' and '\n' respectively.
To improve the loading efficiency, one may concurrently issue several loading statements to read CSV files from different grids. Our experimental demonstrate that a RubatoDB server distributed over 4 servers is capable of loading 1 TB data per hour.
Example 12. The following example first creates a table, stored at the grid
1, and then inserts one row using a standard insert statement. It
further uses an SQL load statement to load 8 rows from a csv file,
named pet.txt.
Note that one has to modify the path name of tests/pet.sql
to be the actual path of the csv file pet.txt.
mysql> CREATE TABLE pet (
         name    varchar(100) primary key,
         owner   varchar(100) not null,
         species varchar(30),
         sex     char(1),
         birth   date,
         death   date
)
PARTITION BY GRID (name) TO 2 NODES WITH  mod (2);
Query OK, 0 rows affected (0.03 sec)

mysql> INSERT INTO pet VALUES('Sarah', 'Sarah', 'goat', 'f', '1979-08-31','2015-02-28');
Query OK, 1 row affected (0.01 sec)


mysql> LOAD DATA INFILE '~/pet.txt' INTO TABLE pet;
Query OK, 8 rows affected (0.02 sec)

mysql> select * from pet;
+----------+---------+---------+------+------------+------------+
| name     | owner   | species | sex  | birth      | death      |
+----------+---------+---------+------+------------+------------+
| Bowser   | Diane   | dog     | m    | 1979-08-31 | 1995-07-29 |
| Buffy    | Harold  | dog     | f    | 1989-05-13 | 0000-00-00 |
| Chirpy   | Gwen    | bird    | f    | 1998-09-11 | 0000-00-00 |
| Claws    | Gwen    | cat     | m    | 1994-03-17 | 0000-00-00 |
| Fang     | Benny   | dog     | m    | 1990-08-27 | 0000-00-00 |
| Fluffy   | nHarold | cat     | f    | 1993-02-04 | 0000-00-00 |
| Sarah    | Sarah   | goat    | f    | 1979-08-31 | 2015-02-28 |
| Slim     | Benny   | snake   | m    | 1996-04-29 | 0000-00-00 |
| Whistler | Gwen    | bird    |      | 1997-12-09 | 0000-00-00 |
+----------+---------+---------+------+------------+------------+
9 rows in set (0.00 sec)
|
| [ < ] | [ > ] | [ << ] | [ Up ] | [ >> ] | [Top] | [Contents] | [Index] | [ ? ] |
RubatoDB supports cursors inside stored programs. The syntax is as in embedded SQL.
Example 13. The following example demos usages of RubatoDB cursors.
(The statements are also contained in the file tests/cursor.sql.)
mysql> create table ttt(
          t1 int primary key,
          t2 varchar(100),
          t3 int
       )
       PARTITION BY GRID (t1) TO 2 NODES WITH  mod (2);
Query OK, 0 rows affected (0.02 sec)

mysql> create table ttt2 (
          t1 int primary key,
          t2 varchar(100),
          t3 int
       )  PARTITION BY GRID (t1) TO 2 NODES WITH  mod (2);
Query OK, 0 rows affected (0.03 sec)

mysql> create table ttt3 (
          t1 int primary key,
          t2 varchar(100)
       )
       PARTITION BY GRID (t1) TO 2 NODES WITH  mod (2);
Query OK, 0 rows affected (0.02 sec)

mysql> insert into ttt values(10, 'just do it', 100);
Query OK, 1 row affected (0.03 sec)

mysql> insert into ttt values(11, 'yes we can', 101);
Query OK, 1 row affected (0.01 sec)

mysql> insert into ttt values(20, 'just say no', 201);
Query OK, 1 row affected (0.00 sec)

mysql> insert into ttt values(21, 'change', 202);
Query OK, 1 row affected (0.00 sec)

mysql>
mysql> insert into ttt2 values(10, 'be happy', 100);
Query OK, 1 row affected (0.04 sec)

mysql> insert into ttt2 values(11, 'be cool', 101);
Query OK, 1 row affected (0.01 sec)

mysql> insert into ttt2 values(20, 'xyz says', 201);
Query OK, 1 row affected (0.00 sec)

mysql> insert into ttt2 values(21, 'abc di it', 202);
Query OK, 1 row affected (0.00 sec)

mysql> DELIMITER $$
mysql> CREATE PROCEDURE curdemo()
       BEGIN
         DECLARE done INT DEFAULT FALSE;
         DECLARE b varchar(100);
         DECLARE c varchar(100);
         DECLARE a INT;
         DECLARE cur1 CURSOR FOR SELECT t1,t2 FROM ttt;
         DECLARE cur2 CURSOR FOR SELECT t2 FROM ttt2;
         DECLARE CONTINUE HANDLER FOR NOT FOUND SET done = TRUE;

         OPEN cur1;
         OPEN cur2;

         read_loop: LOOP
           FETCH cur1 INTO a, b;
           FETCH cur2 INTO c;
           IF done THEN
             LEAVE read_loop;
           END IF;
           IF b < c THEN
             INSERT INTO ttt3 VALUES (a,b);
           ELSE
             INSERT INTO ttt3 VALUES (a,c);
           END IF;
         END LOOP;

         CLOSE cur1;
         CLOSE cur2;
       END
       DISTRIBUTED  TO 2 NODES with mod (2) $$

Query OK, 0 rows affected (0.00 sec)

mysql> DELIMITER ;
mysql> select * from ttt3;
Empty set (0.02 sec)

mysql> call curdemo();
Query OK, 0 rows affected (0.00 sec)

mysql> select * from ttt3;
+----+-------------+
| t1 | t2          |
+----+-------------+
| 10 | be happy    |
| 20 | just say no |
| 11 | be cool     |
| 21 | abc di it   |
+----+-------------+
4 rows in set (0.00 sec)
|
| [ < ] | [ > ] | [ << ] | [ Up ] | [ >> ] | [Top] | [Contents] | [Index] | [ ? ] |
RubatoDB supports stored procedures and a demo example is given below.
(The SQL statements for this example are contained in RubatoDB/tests/sp.sql.)
Note that, unlike MySQL, RubatoDB does not support the INOUT parameters in stored procedures, as shown in the procedure sp4 below.
/*
 *  A sample program to demo how to use store procedures
 */
mysql> DROP TABLE IF EXISTS  test;
Query OK, 0 rows affected (0.00 sec)

mysql> drop procedure if exists sp1;
Query OK, 0 rows affected (0.00 sec)

mysql> drop procedure if exists sp2;
Query OK, 0 rows affected (0.00 sec)

mysql> drop procedure if exists sp3;
Query OK, 0 rows affected (0.00 sec)

mysql> drop procedure if exists sp4;
Query OK, 0 rows affected (0.00 sec)

mysql> delimiter //

mysql> CREATE TABLE test(
       id int(11)
       )
       partition by grid (id) to 2 nodes with mod (2)  //
Query OK, 0 rows affected (0.13 sec)

mysql> create procedure sp1(in p int)
       begin
       declare v1 int;
       set v1 = p;
       insert into test(id) values(v1);
       end
       DISTRIBUTED BY PARAMETER (p) TO 2 NODES with mod (2) //
Query OK, 0 rows affected (0.00 sec)

mysql> call sp1(1)//
Query OK, 0 rows affected (0.01 sec)

mysql> select * from test order by id//
+------+
| id   |
+------+
|    1 |
+------+
1 row in set (0.09 sec)

mysql> create procedure sp2(out p int)
       begin
       select max(id) into p from test;
       end//

mysql> call sp2(@pv)//
Query OK, 0 rows affected (0.01 sec)

mysql> select @pv as '@pv' //
+-----+
| @pv |
+-----+
| 1   |
+-----+
1 row in set (0.00 sec)

mysql> create procedure sp3(in p1 int,out p2 int)
       begin
         if p1=1 then
           set @v=10;
         else
           set @v=20;
         end if;
         insert into test(id) values(@v);
         select max(id) into p2 from test;
       end
       DISTRIBUTED BY PARAMETER (p1) TO 2 NODES with mod (2) //
Query OK, 0 rows affected (0.01 sec)

mysql> select * from test order by id //
+------+
| id   |
+------+
|    1 |
+------+
1 row in set (0.01 sec)

mysql> call sp3(2,@ret) //
Query OK, 0 rows affected (0.01 sec)

mysql> select @ret as '@ref' //
+------+
| @ref |
+------+
| 20   |
+------+
1 row in set (0.00 sec)

mysql> SELECT * FROM test ORDER BY id //
+------+
| id   |
+------+
|    1 |
|   20 |
+------+
2 rows in set (0.01 sec)

mysql> create procedure sp4(inout p4 int)
       begin
         if p4 = 4 then
           set @pg = 400;
         else
           set @pg = 500;
         end if;
         select @pg into p4;
       end //
ERROR 1234 (68000):  the INOUT parameter is NOT supported for this version

mysql> create procedure sp4(in p4 int,out p5 int)
       begin
         if p4 = 4 then
           set @pg = 400;
         else
           set @pg = 500;
         end if;
         select @pg into p5;
       end //
Query OK, 0 rows affected (0.00 sec)

mysql> delimiter ;

mysql> set @pp = '6';
Query OK, 0 rows affected (0.00 sec)

mysql> call sp4(@pp, @pp2);
Query OK, 0 rows affected (0.01 sec)

mysql> select @pp2 as '@pp2'
+------+
| @pp2 |
+------+
| 500  |
+------+
1 row in set (0.00 sec)

mysql> set @pp =4;
Query OK, 0 rows affected (0.00 sec)

nmysql>  call sp4(@pp, @pp2);
Query OK, 0 rows affected (0.07 sec)

mysql> select @pp2 as '@pp2'
+------+
| @pp2 |
+------+
| 400  |
+------+
1 row in set (0.01 sec)

mysql> select @pp as '@pp'
+-----+
| @pp |
+-----+
| 4   |
+-----+
1 row in set (0.00 sec)
|
| [ < ] | [ > ] | [ << ] | [ Up ] | [ >> ] | [Top] | [Contents] | [Index] | [ ? ] |
Example 15. In this example, we use triggers on the insert to one
table to populate another table. (See RubatoDB/tests/trig.sql.)
mysql> CREATE TABLE test1(a1 INT);
Query OK, 0 rows affected (0.04 sec)

mysql> CREATE TABLE test2(a2 INT);
Query OK, 0 rows affected (0.02 sec)

mysql> delimiter ||

mysql> CREATE TRIGGER testref BEFORE INSERT ON test1
         FOR EACH ROW
         BEGIN
           INSERT INTO test2 SET a2 = NEW.a1;
         END ||
Query OK, 0 rows affected (0.04 sec)

mysql> delimiter ;

mysql> INSERT INTO test1 VALUES (2);
Query OK, 1 row affected (0.04 sec)

mysql> INSERT INTO test1 VALUES (1);
Query OK, 1 row affected (0.00 sec)

mysql> INSERT INTO test1 VALUES (7);
Query OK, 1 row affected (0.00 sec)

mysql> INSERT INTO test1 VALUES (8);
Query OK, 1 row affected (0.00 sec)

mysql> INSERT INTO test1 VALUES (4);
Query OK, 1 row affected (0.00 sec)

mysql> INSERT INTO test1 VALUES (4);
Query OK, 1 row affected (0.00 sec)

mysql> SELECT * FROM test1;
+------+
| a1   |
+------+
|    1 |
|    2 |
|    4 |
|    4 |
|    7 |
|    8 |
+------+
6 rows in set (0.00 sec)

mysql> SELECT * FROM test2;
+------+
| a2   |
+------+
|    1 |
|    2 |
|    4 |
|    4 |
|    7 |
|    8 |
+------+
6 rows in set (0.02 sec)

mysql>
|
Example 16. In the following example, we use a trigger to enforce the constraint that any employee must have a supervisor.
mysql> CREATE TABLE employee(
         e_id int,
         e_name varchar(64),
         position varchar(64),
         salary decimal(10,2)
       )
       PARTITION BY GRID (e_id) TO 2 NODES WITH  mod (2);
Query OK, 0 rows affected (0.02 sec)

mysql> CREATE TABLE supervision(
         e_id int,
         e_name varchar(64),
         s_name varchar(64)
       )
       PARTITION BY GRID (e_id) TO 2 NODES WITH  mod (2);
Query OK, 0 rows affected (0.02 sec)

mysql> delimiter |

mysql> create trigger employee_supervisor
       before insert  on employee
       for each row
       begin
          declare   dummy int;
          declare   msg varchar(200);
          select count(*) into dummy from supervision
          where new.e_name = supervision.e_name
                and supervision.s_name is not NULL;

          if ( dummy < 1 )
          then
            set msg = 'employee must has a supervisor';
                   SIGNAL SQLSTATE 'HY000' SET MESSAGE_TEXT = msg;
          end if;
       end;
       |
Query OK, 0 rows affected (0.04 sec)

mysql> delimiter ;

mysql> INSERT INTO supervision VALUES (1,'tom','peter');
Query OK, 1 row affected (0.03 sec)

mysql> INSERT INTO employee VALUES (1,'tom','engineer',1000.00);
Query OK, 1 row affected (0.02 sec)

mysql> INSERT INTO employee VALUES (2,'shelly','engineer',1000.00);
ERROR 1644 (HY000):  employee must has a supervisor

mysql> select * from supervision;
+------+--------+--------+
| e_id | e_name | s_name |
+------+--------+--------+
|    1 | tom    | peter  |
+------+--------+--------+
1 row in set (0.04 sec)

mysql> select * from employee;
+------+--------+----------+---------+
| e_id | e_name | position | salary  |
+------+--------+----------+---------+
|    1 | tom    | engineer | 1000.00 |
+------+--------+----------+---------+
1 row in set (0.04 sec)
|
| [ < ] | [ > ] | [ << ] | [ Up ] | [ >> ] | [Top] | [Contents] | [Index] | [ ? ] |
RubatoDB supports all the MySQL application tools for lob operations, except the function load_file() and the select into dumpfil clause.
We are going to use examples to demonstrate how to populate and query lobs using JDBC-based Java programs.
First, we assume that the system has create a user sqltest with all privileges on a schema (or database) sqltest. Further we also assume that a table has been created by the following statement:
create table picture (
     photo_id integer,
     title varchar(48),
     place varchar(48),
     sm_image blob,
     image blob,
     constraint picture_primary_key_constraint primary key(photo_id)
)
|
Example 17. The following two Java programs are used to insert and select lobs into/from a database tables.
import java.io.*;
import java.sql.*;

/**
 *  A simple example to demonstrate how to use JDBC PreparedStatement
 *  to insert a Blob into a table. The table PICTURE used in the example
 *  is created with
 *    create table picture (
 *        photo_id integer,
 *        title varchar(48),
 *        place varchar(48),
 *        sm_image blob,
 *        image blob,
 *        constraint picture_primary_key_constraint primary key(photo_id) )
 *
 *
 *  Compile:  javac InsertLobs.java
 *      Run: java -cp ./:/usr/share/java/mysql-connector-java-5.1.26-bin.jar InsertLobs 10 /home/sf_user/images img
 *  Command line arguments
 *    10:  the number of rows to be inserted
 *    /home/sf_user/testing:  the directory containing all the images files
 *    img:  the file name, i.e.,  sm_img1.jpg  img1.jpg,  sm_img2.jpg, img2.jpg, ...,
 *
 */
public class InsertLobs {

    public static void main( String[] args)  {

	//  Take three arguments from the command line
	System.out.println("Number of Command Line Arguments: " + args.length);
	if (args.length != 3)  {
	    System.out.println("The number of command line arguments must be 3");
	    return;
	}

	int no_rows=Integer.parseInt(args[0]);
	System.out.println("Directory: " + args[1]);
	System.out.println("File Name: " + args[2]);
	System.out.println("We are going to insert "+ no_rows + " rows with lobs to table picture");

	//  change the following parameters to connect to other databases
	String username = "sqltest";
	String password = "sqltest";
	String drivername = "com.mysql.jdbc.Driver";
	String dbstring = "jdbc:mysql://127.0.0.1:8010";
	int index;

	String indexString=null;

	Connection conn;
	try {
	    // to connect to the database
	    conn = getConnected(drivername,dbstring, username,password);
	    System.out.println( "It has connected to the database");

	    //  create a preparedStatement with
	    //   ?  represents the lobs to be inserted
	    PreparedStatement stmt = conn.prepareStatement(
              "insert into sqltest.picture values (?,'Eiffel Tower','Paris',?,? )" );

	    System.out.println( "Set up prepareStatement");

	    for (index=1;index<=no_rows;index++) {

		stmt.setString(1,Integer.toString(index+200));

		// Set the first parameter
		File file = new File(args[1]+"/sm_"+args[2]+index+".jpg");
		stmt.setBinaryStream(2,new FileInputStream(file),(int)file.length());

		System.out.println( "Set Binary Stream 1 ");
		// set the second parameter
		file = new File(args[1]+"/"+args[2]+index+".jpg");
		stmt.setBinaryStream(3,new FileInputStream(file),(int)file.length());

		System.out.println( "Set Binary Stream 2 ");

		// execute the insert statement
		stmt.executeUpdate();

		System.out.println( "Insertion of Row " + index + " succeeds");
	    }

	    conn.close();
	} catch( Exception ex ) {
	    System.out.print( "Failed to  ");
	    System.out.println( ex.getMessage());
	}
    }

    /*
     *   To connect to the specified database
     */
    private static Connection getConnected( String drivername,
					    String dbstring,
					    String username,
					    String password  )
	throws Exception {
	Class drvClass = Class.forName(drivername);
	DriverManager.registerDriver((Driver) drvClass.newInstance());
	return( DriverManager.getConnection(dbstring,username,password));
    }
}
|
The next program is used to download lobs from the table picture.
/**
 *  A simple example to demonstrate how to use JDBC PreparedStatement
 *  to retrieve a Blob from a table. The table PICTURE used in the example
 *  is created with
 *    create table picture (
 *        photo_id integer,
 *        title varchar(48),
 *        place varchar(48),
 *        sm_image blob,
 *        image blob,
 *        constraint picture_primary_key_constraint primary key(photo_id) )
 *
 *  It is based on a program downloaded from
 *    https://stackoverflow.com/questions/39231153/download-blob-data-from-mysql-database-via-java
 *
 *  Modified on March 15, 2019 using MySQL JDBC Driver shown below.
 *
 *  Compile:  javac InsertLobs.java
 *      Run: java -cp ./:/usr/share/java/mysql-connector-java-5.1.26-bin.jar GetLobs
 *
 *  @author  Li-Yan Yuan
 *
 */
import java.io.File;
import java.io.FileNotFoundException;
import java.io.FileOutputStream;
import java.io.IOException;
import java.io.InputStream;
import java.sql.Connection;
import java.sql.DriverManager;
import java.sql.ResultSet;
import java.sql.SQLException;
import java.sql.ResultSetMetaData;

 public class GetLobs {

    public static void main(String[] args) {

	String user = "sqltest";
	String pass = "sqltest";
	String drivername = "com.mysql.jdbc.Driver";
	String host = "jdbc:mysql://localhost:8010";
	//    	String SQL = "SELECT image FROM picture";
	String SQL = "SELECT * FROM sqltest.picture";

	Connection conn = null;
	java.sql.PreparedStatement smt = null;
	InputStream input = null;
	FileOutputStream output = null;
	ResultSet rs = null;
	Integer index=1;
	Integer row_count=0;
	String column_name=null;
	int type;

	try {
	    Class.forName("com.mysql.jdbc.Driver");
	    System.out.println("Connecting...");

	    conn = DriverManager.getConnection(host, user, pass);
	    System.out.println("Connection successful..\nNow creating query...");

	    smt = conn.prepareStatement(SQL);

	    System.out.println("b4 executionQuery() done");
	    rs = smt.executeQuery();

	    System.out.println("executionQuery() done");

	    System.out.println("Getting file please be patient..");


	    ResultSetMetaData rsetMetaData = rs.getMetaData();
	    int degree = rsetMetaData.getColumnCount();
	    System.out.println("Degree of the result set " + degree);

	    /*
	     *   We shall store each lob into one local file of the form
	     *    BIT,BINARY,VARBINARY,BLOB,LONGVARBINARY:
	     */
	    System.out.println("java.sql.Types " + java.sql.Types.LONGVARBINARY + ", " +  java.sql.Types.BLOB );
	    while (rs.next()) {
		row_count++;

		for (index=1;index<=degree;index++) {

		    column_name = rsetMetaData.getColumnLabel(index);
		    type = rsetMetaData.getColumnType(index);

		    System.out.println("Row: " + row_count + " Column: " + column_name + ",  Type: " + type + ",  Column Order: " + index);

		    if (type==java.sql.Types.LONGVARBINARY || type==java.sql.Types.LONGVARCHAR||
			type==java.sql.Types.BLOB||type==java.sql.Types.BINARY )  {


			input = rs.getBinaryStream(column_name); //get it from col name

			output = new FileOutputStream(new File("/home/lyuan/images/pic"+row_count+"_"+index+".jpg"));
			System.out.println("new file name "+ "/home/lyuan/images/pic"+row_count+"_"+index+".jpg");
			int r = 0;
			while ((r = input.read()) != -1) {
			    output.write(r);
			}

			input.close();
			output.flush();
			output.close();
		    }
		}
	    }
	    System.out.println("File writing complete !");

	} catch (ClassNotFoundException e) {
	    System.err.println("Class not found!");
	    e.printStackTrace();
	} catch (SQLException e) {
	    System.err.println("Connection failed!");
	    e.printStackTrace();
	} catch (FileNotFoundException e) {
	    System.err.println("File not found!");
	    e.printStackTrace();
	} catch (IOException e) {
	    System.err.println("File writing error..!");
	    e.printStackTrace();
	}finally {
	    if(rs != null){
		try {
		    input.close();
		    output.flush();
		    output.close();
		    smt.close();
		    conn.close();
		} catch (SQLException e) {
		    System.err.println("Connot close connecton!");
		} catch (IOException e) {
		    // TODO Auto-generated catch block
                e.printStackTrace();
		}
	    }
	}
    }
}
|
| [ < ] | [ > ] | [ << ] | [ Up ] | [ >> ] | [Top] | [Contents] | [Index] | [ ? ] |
Example 18. This example demos the transaction facilities with the ACID properties supported by RubatoDB over distributed table.
mysql> CREATE TABLE employee(
         e_id int,
         e_name varchar(64),
         position varchar(64),
         salary decimal(10,2)
       )
       PARTITION BY GRID (e_id) TO 2 NODES WITH  mod (2);
Query OK, 0 rows affected (0.02 sec)

mysql> start transaction;
Query OK, 0 rows affected (0.00 sec)

mysql> INSERT INTO employee VALUES (1,'tom','engineer',1000.00);
Query OK, 1 row affected (0.02 sec)

mysql> INSERT INTO employee VALUES (2,'shelly','engineer',1000.00);
Query OK, 1 row affected (0.00 sec)

mysql> commit;
Query OK, 0 rows affected (0.00 sec)

mysql> select * from employee;
+------+--------+----------+---------+
| e_id | e_name | position | salary  |
+------+--------+----------+---------+
|    2 | shelly | engineer | 1000.00 |
|    1 | tom    | engineer | 1000.00 |
+------+--------+----------+---------+
2 rows in set (0.04 sec)

mysql> start transaction;
Query OK, 0 rows affected (0.00 sec)

mysql> INSERT INTO employee VALUES (3,'tom','engineer',1000.00);
Query OK, 1 row affected (0.00 sec)

mysql> INSERT INTO employee VALUES (4,'shelly','engineer',1000.00);
Query OK, 1 row affected (0.00 sec)

mysql> rollback;
Query OK, 0 rows affected (0.00 sec)

mysql> select * from employee;
+------+--------+----------+---------+
| e_id | e_name | position | salary  |
+------+--------+----------+---------+
|    2 | shelly | engineer | 1000.00 |
|    1 | tom    | engineer | 1000.00 |
+------+--------+----------+---------+
2 rows in set (0.04 sec)

mysql> start transaction;
Query OK, 0 rows affected (0.00 sec)

mysql> INSERT INTO employee VALUES (3,'tom','engineer',1000.00);
Query OK, 1 row affected (0.00 sec)

mysql> INSERT INTO employee VALUES (4,'shelly','engineer',1000.00);
Query OK, 1 row affected (0.00 sec)

mysql> commit;
Query OK, 0 rows affected (0.00 sec)

mysql> select *  from employee;
+------+--------+----------+---------+
| e_id | e_name | position | salary  |
+------+--------+----------+---------+
|    2 | shelly | engineer | 1000.00 |
|    4 | shelly | engineer | 1000.00 |
|    1 | tom    | engineer | 1000.00 |
|    3 | tom    | engineer | 1000.00 |
+------+--------+----------+---------+
4 rows in set (0.04 sec)
|
| [ < ] | [ > ] | [ << ] | [ Up ] | [ >> ] | [Top] | [Contents] | [Index] | [ ? ] |
| 3.1 Installation | ||
| 3.2 Monitoring Database Server | ||
| 3.3 Managing Database Server | ||
| 3.4 Server Runtime Environment | ||
| 3.5 Database User Management | ||
| 3.6 Grant Statement |
| [ < ] | [ > ] | [ << ] | [ Up ] | [ >> ] | [Top] | [Contents] | [Index] | [ ? ] |
| 3.1.1 Pre-installation | ||
| 3.1.2 Manual Installation | ||
| 3.1.3 Auto Re-Start | ||
| 3.1.4 Auto Installation | ||
| 3.1.5 Installation of Application Tools |
To install the RubatoDB, one shall first take the following two steps:
http://webdocs.cs.ualberta.ca/~yuan/databases/rubatodb/rubatodb_dist.4.0.2.tar.gz
Note that the package includes the RubatoDB 4.0.2 server (for Glibc 2.15), a (MySQL) JDBC driver, and a MySQL GUI tool.
Currently, only the Linux distribution is available and thus it can only be installed on a collection of Linux servers. The current distribution of RubatoDB works for Linux systems with Glibc 2.15 or newer, and therefore, one has to upgrade the Linux system if its Glibc is older.
In order to make sure RubatoDB runs smoothly, especially if the number of concurrent clients exceeds 1024, one shall set up the Linux system properly, as outlined in Pre-installation.
| [ < ] | [ > ] | [ << ] | [ Up ] | [ >> ] | [Top] | [Contents] | [Index] | [ ? ] |
RubatoDB is designed to run on a set of commodity machines and/or virtual instances as one DBMS server, and the pre-installation outlined below must be done on each and every commodity machine in the set.
The following commands add the rubatodb group and the rubatodb user. You might want to call the user and group something else instead of mysql. If so, substitute the appropriate name in the following instructions. The syntax for useradd and groupadd may differ slightly on different versions of Unix/Linux, or they may have different names such as adduser and addgroup.
Linux > groupadd rubatodb Linux > useradd -m -g rubatodb rubatodb |
RubatoDB will use Rsync to copy files over SSH for
synchronizing the database states among all replication nodes, and
therefore, one has to set up Rsync with SSH on Linux without using
password.
rsync
For Ubuntu, one can use the following
Linux > sudo apt-get install rsync |
Other system, refer to the respective manuals.
Now setup ssh so that it does not ask for password when you perform ssh. Use ssh-keygen on local server to generate public and private keys.
Linux > ssh-keygen Enter passphrase (empty for no passphrase): Enter same passphrase again: |
Note that when it asks you to enter the passphrase just press enter key, and do not give any password here.
Use ssh-copy-id, to copy the public key to the remote host.
Linux > ssh-copy-id -i ~/.ssh/id_rsa.pub 192.168.123.456 |
The above will ask the password for your account on the remote host, and copy the public key automatically to the appropriate location.
Now, you should be able to ssh to remote host and to use Rsync to copy a directory from the remote host, without entering the password.
rsync -avz -e ssh rubatodb@192.168.123.456:/home/rubatodb/backup /home/rubatodb/ |
Note that one has to set up rsync over ssh without password on all Linux servers and/or virtual instances used for the RubatoDB. For any pair of servers S1 and S2, the set up has to be done from S1 to S2 as well as from S2 to S1.
Make sure you have sufficient disk space. You will need 200 MB for the installation directory, and at least 1GB for an empty database. It takes about one to two times the amount of space that a flat text file with the same data would take.
The disk space requirement for the backup log depends on the frequency of updates in your applications and the frequency of database archive operations.
In bash, this limit can be found using the command
ulimit -a, as shown below.
Linux:> ulimit -a core file size (blocks, -c) 0 data seg size (kbytes, -d) unlimited scheduling priority (-e) 0 file size (blocks, -f) unlimited pending signals (-i) 62959 max locked memory (kbytes, -l) 64 max memory size (kbytes, -m) unlimited open files (-n) 32768 pipe size (512 bytes, -p) 8 POSIX message queues (bytes, -q) 819200 real-time priority (-r) 0 stack size (kbytes, -s) 8192 cpu time (seconds, -t) unlimited max user processes (-u) 62959 virtual memory (kbytes, -v) unlimited file locks (-x) unlimited |
In tcsh, this limit can be found using the command
limit, as shown below.
Linux:> limit cputime unlimited filesize unlimited datasize unlimited stacksize 8192 kbytes coredumpsize 0 kbytes memoryuse unlimited vmemoryuse unlimited descriptors 1024 memorylocked 64 kbytes maxproc 14852 maxlocks unlimited maxsignal 14852 maxmessage 819200 |
This shows that the limit on the number of descriptors/open files is 1024, which means the total number of tables and concurrent clients cannot exceed 1024. Usually, a database has a few hundred tables, and therefore, this limit is not sufficient for most applications. One must change this limit to a larger number, say 16384, to make sure the system will not run into trouble later.
Many operating system also limits the size of files, usually around 2GB. Again, change this into unlimited to save future trouble. Consult one's system administrator to find out how to increase the limits on both file descriptors and file sizes.
For example, to set a proper limit on descriptors on a Linux system,
one shall first edit the system file
/etc/security/limits.conf
with two lines
username hard nofile 32768,
username soft nofile 32768,
Note that all words are separated by a tab, not a white space, and one, with the given username, has to log out and then log in to use the new configuration.
After re-log in, the user shall then use
Linux:> limit descriptors 8192
to set the limit on the number of open files to be 8192.
or
Linux:> unlimit descriptors
to set the file descriptors to the limit specified by
in the file named /etc/security/limits.conf .
In bash, to set the number of open files, one can use
ulimit -n 16384
Note that the default is usually set to 1024, and thus editing the file is necessary. If you have any difficulty to set up proper environment variables and/or limit variables consult your local system administrators.
RubatoDB uses a ramdisk mounted at /run/shm for efficiency, and thus it is important to set it up properly. The following will create a 2G Ramdisk that will always to available.
Linux> sudo mkdir -p /run/shm
Linux> sudo mount -t tmpfs -o size=2048M tmpfs /run/shm
Linux> sudo chmod -R 777 /run/shm
The ramdisk folder is owned by root as it is to be available on reboot. The ramdisk permissions should be writeable by everyone.
For each server used, RubatoDB will configure a set of socket ports for both client requests and/or communication between internal grid nodes. Therefore one has to make sure all ports specified are available for use.
There are two approached to installing RubatoDB on a collection of Linux Servers:
| [ < ] | [ > ] | [ << ] | [ Up ] | [ >> ] | [Top] | [Contents] | [Index] | [ ? ] |
Assuming that the distribution file is named rubatodb_dist.tar.gz,
use the following to uncompress the file
Linux> tar -zxvf rubatodb_dist.tar.gz |
Then the distribution package
(under the directory RubatoDB_dist)
contains the following directories and files:
auto_installation.sh
bin
config
data
docs
lib
README
sf_system
tests
The first script file, auto_installation.sh, is used to configure, set-up, initialize, and run the RubatoDB system.
The directories, bin, config, data, lib and sf_system contain the RubatoDB system.
README describes the basic info for the distribution,
and tests contains some of the testing programs.
To install RubatoDB manually on a Linux term, one needs to do the following steps.
Step 1. Configuration of the System
To configure the RubatoDB server, one has to provide at least the following information:
This is the port number of the main node (Node 0) which is used to receive all the requests from clients. The default is 8010.
The integer N must be greater or equal to 1, and less than the MAX_NODE as specified in the distribution.
The integer R must be greater or equal to 1, and for this distribution, it has to be 1.
(note that it is OK to configure two nodes in the same server, and hence with the same IP address.)
If there are two or more RubatoDB nodes (partitions) that are configured on the same server then their Node Port and Installation Directory must be different.
An interactive configuration program, located as
RubatoDB_dist/bin/one_step_setup,
has been provided for configuring
the aforementioned information.
This program works only at the directory RubatoDB_dist/bin, and thus
it should be done as follows, at the directory RubatoDB_dist
Linux> cd bin Linux> one_step_setup |
Follow the instructions on the screen after the program starts.
This will create system configuration files to be used for each and every node.
A screen shot of the configuration wit four grid nodes, using all the default values if possible, is given below.
Linux ./one_step_setup
----------------------------------------------------------

   We are going to configure the RubatoDB server

----------------------------------------------------------

   Enter monitor socket:
   The   monitor socket:  8010
     Enter y to confirm:  y

----------------------------------------------------------

   The Monitor socket port is 8010

----------------------------------------------------------


   Enter number of grid nodes:  4
   The   number of grid nodes:  4
     Enter y to confirm:  y

----------------------------------------------------------

   The number of Grid Nodes is 4

----------------------------------------------------------


   Enter replication factor:  1
   The   replication factor:  1
     Enter y to confirm:  y

----------------------------------------------------------

   The Replication Factor is 1

----------------------------------------------------------


----------------------------------------------------------
   Now, for each node, enter IP, Port, and Installation directory
----------------------------------------------------------


----------------------------------------------------------
   Node 0:  Replication 0
           Enter the IP address:
          Enter the port number:
          Enter the replication port number:
            Enter  installation:

   Please confirm the following information
   ------------------------------
        ip_address: 127.0.0.1
              port: 5000
 replication  port: 4000
      installation: /home/yuan/RubatoDB0_0
   ------------------------------

           Enter y to confirm::  y

----------------------------------------------------------


----------------------------------------------------------
   Node 1:  Replication 0
           Enter the IP address:
          Enter the port number:
          Enter the replication port number:
            Enter  installation:

   Please confirm the following information
   ------------------------------
        ip_address: 127.0.0.1
              port: 5100
 replication  port: 4100
      installation: /home/yuan/RubatoDB1_0
   ------------------------------

           Enter y to confirm::  y

----------------------------------------------------------


----------------------------------------------------------
   Node 2:  Replication 0
           Enter the IP address:
          Enter the port number:
          Enter the replication port number:
            Enter  installation:

   Please confirm the following information
   ------------------------------
        ip_address: 127.0.0.1
              port: 5200
 replication  port: 4200
      installation: /home/yuan/RubatoDB2_0
   ------------------------------

           Enter y to confirm::  y

----------------------------------------------------------


----------------------------------------------------------
   Node 3:  Replication 0
           Enter the IP address:
          Enter the port number:
          Enter the replication port number:
            Enter  installation:

   Please confirm the following information
   ------------------------------
        ip_address: 127.0.0.1
              port: 5300
 replication  port: 4300
      installation: /home/yuan/RubatoDB3_0
   ------------------------------

           Enter y to confirm::  y

----------------------------------------------------------

---------------------------------------------------------------------------------
 Node ID  Replication ID   IP Address   Port   R-Port     Installation Directory
---------------------------------------------------------------------------------
       0        0         127.0.0.1     5000      4000     /home/yuan/RubatoDB0_0
       1        0         127.0.0.1     5100      4100     /home/yuan/RubatoDB1_0
       2        0         127.0.0.1     5200      4200     /home/yuan/RubatoDB2_0
       3        0         127.0.0.1     5300      4300     /home/yuan/RubatoDB3_0
---------------------------------------------------------------------------------

   Enter y to confirm the info:  y

Linux>
|
Step 2. Installation of the System Code
In the previous step, each node is configured to be installed on
Installation Directory of a server with the specific
NodeIP.
The installation is a simple process of copying
all documents and programs contained in the directory
RubatoDB_dist into the Installation Directory of each
and every node.
More specific, for each and every node, one needs to
RubatoDB_dist/ into the installation
directory.
This can be done using
Since all the nodes use the same configuration files (for now) and
system programs,
it is better to create a compressed file containing all the files and
directories at RubatoDB_dist/.
For example, one may use the following to create a compressed tar file to be
distributed to the installation directories of all nodes.
(It should be done t the directory RubatoDB_dist.)
Linux> tar -czvf RubatoDB.tar.gz * |
The compressed tar file contains all the files and directories in RubatoDB_dist.
RubatoDB.tar.gz into the
installation directory, using scp (or cp)
Linux> scp RubatoDB.tar.gz user_name@NodeIP |
Linux> tar -zxvf RubatoDB.tar.gz |
This will complete the installation of the system code.
RubatoDB stores all the data files and lob files in the data cluster and lob cluster respectively.
A data cluster is a collection of data files that will be accessible through a single instance of a running database server.
In file system terms, a data cluster will be a single directory under which all data will be stored. We call this data area.
A lob cluster, similar to the data cluster, is a single directory under which all lob items will be stored. We call this lobs area.
The default data cluster and lob cluster are the following two directories under the installation directory, say RubatoDB,
Skip this step if you use the default setting.
A user may specify, for each and/or any node, the data cluster and/or lob cluster to be any directory under the server node, by editing the configuration file in the respective node
RubatoDB/config/logicsql.conf
where RubatoDB is the installation directory for the node.
Note that the system configuration file RubatoDB/config/logicsql.conf
is used to set up desired values for the configuration variables.
In the sequence, by setting a configuration variable to be a specified value, we mean editing the line (or inserting a new line) that contains the variable such that the line will starts with the variable, followed by the value with one white space in between.
For example, by setting ServerPort to be 8010, we
edit the line that contains ServerPort to the following
ServerPort 8010
The following table summaries the basic task of configuration.
| Config. Variable | Meaning of the Value | Status |
DataDirectory | path name of the data cluster | optional with default being RubatoDB/data |
LobDirectory | path name of the lob cluster | optional with default being RubatoDB/lobs |
LogDirectory | path name of the log area | optional with default being RubatoDB/logs |
ServerPort | port number of the server socket | mandatory with the initial being 8010 |
LogStatus | the crash recovery schema | mandatory with initial being local_log |
CommandLog | the log used to store all SQL statements received | optional with default being off. |
Note that different grid nodes need not to use the same configuration file, especially the path names of data cluster and lob cluster.
Step 4. Creation of the Initial Database
After successful installation of RubatoDB in all grid nodes, one has
to create the initial database on all nodes. This can be done by using the
following command in each and every node, assuming the full path name
of the installation directory is /home/user_name/RubatoDB0_0 for
the node:
Linux:> /home/user_name/RubatoDB0_0/bin/logicsql -d /home/user_name/RubatoDB0_0 -c
This will create the initial database system in the data cluster of the current node. This will also automatically create a system user named 'system' with the default password 'manager'.
The initial database will be created independently in each node, and thus, it can be done in any ordering of grid nodes.
Step 5. Starting the RubatoDB server
You must start the RubatoDB server before anyone can access the database. A simple example below to demo how to start the RubatoDB server.
Assume that you are going to run RubatoDB on four (4) grid nodes, and have configured the system accordingly. Further, all the initial databases have been created as well on all four grid nodes.
Start the RubatoDB using the following command on all our nodes, in the
order of node0, node1, node2, node3, as follows:
Node0 Linux:> /home/user_name/RubatoDB0_0/bin/logicsql -d /home/user_name/RubatoDB0_0 -n0 -r0 &
Node1 Linux:> /home/user_name/RubatoDB1_0/bin/logicsql -d /home/user_name/RubatoDB1_0 -n1 -r0 &
Node2 Linux:> /home/user_name/RubatoDB2_0/bin/logicsql -d /home/user_name/RubatoDB2_0 -n2 -r0 &
Node3 Linux:> /home/user_name/RubatoDB3_0/bin/logicsql -d /home/user_name/RubatoDB3_0 -n3 -r0 &
One shall not start the server on Node 1 until the start at Node0 completes, and shall not start the server on Node2 until the start at Node1 completes, and so on so forth.
For each data cluster, only ONE grid node should be started at any time. A separate RubatoDB user account or the corresponding data cluster must be set up if you wish to run two nodes in one computer system.
| [ < ] | [ > ] | [ << ] | [ Up ] | [ >> ] | [Top] | [Contents] | [Index] | [ ? ] |
One may also start the server using the provided script file to make sure that the RubatoDB server will automatically re-start if it crashes for any reason.
In the following, we assume that the server has been configured with 4 grid nodes, each of which has 2 replications.
Node0 Linux:> /home/user_name/RubatoDB0_0/bin/start_rubatodb0_0 &
Node1 Linux:> /home/user_name/RubatoDB1_0/bin/start_rubatodb1_0 &
Node2 Linux:> /home/user_name/RubatoDB2_0/bin/start_rubatodb2_0 &
Node3 Linux:> /home/user_name/RubatoDB3_0/bin/start_rubatodb3_0 &
Node0 Linux:> /home/user_name/RubatoDB0_0/bin/start_rubatodb0_1 &
Node1 Linux:> /home/user_name/RubatoDB1_0/bin/start_rubatodb1_1 &
Node2 Linux:> /home/user_name/RubatoDB2_0/bin/start_rubatodb2_1 &
Node3 Linux:> /home/user_name/RubatoDB3_0/bin/start_rubatodb3_1 &
/etc/rc.local
sudo -u user_name /home/user_name/RubatoDBN_R/bin/start_rubatodbN_R
where N and R are grid id and replication id respectively.
Note that (1) the starting order is not important, though it is better
to start grid 0 first; and (2) different Linux installation may have
different startup schemas, other than using the file /etc/rc/local,
and thus consult your system administrator for details.
The following shows how to configure, initialize, and then start a RubatoDB server configured with 4 grids and 2 replications.
one_step_setup to configure the server.
rubatodb> ~/RubatoDB_dist/bin$ ./one_step_setup

----------------------------------------------------------

   We are going to configure the RubatoDB server

----------------------------------------------------------

   Enter number of grid nodes:  4
   The   number of grid nodes:  4
     Enter y to confirm:  y

----------------------------------------------------------

   The number of Grid Nodes is 4

----------------------------------------------------------


   Enter replication factor:  2
   The   replication factor:  2
     Enter y to confirm:  y

----------------------------------------------------------

   The Replication Factor is 2

----------------------------------------------------------


----------------------------------------------------------
   Now, for each node, enter IP, Port, and Installation directory
----------------------------------------------------------


----------------------------------------------------------
   Node 0:  Replication 0
           Enter the IP address:  10.10.0.2
          Enter the client socket number :
          Enter the internal port number:
          Enter the replication port number:
            Enter  installation:

   Please confirm the following information
   ------------------------------
        ip_address: 10.10.0.2
       client_port: 8010
              port: 5000
 replication  port: 4000
      installation: /home/rubatodb/RubatoDB0_0
   ------------------------------

           Enter y to confirm::  y

----------------------------------------------------------


----------------------------------------------------------
   Node 0:  Replication 1
           Enter the IP address:  10.10.0.2
          Enter the client socket number :
          Enter the internal port number:
          Enter the replication port number:
            Enter  installation:

   Please confirm the following information
   ------------------------------
        ip_address: 10.10.0.2
       client_port: 8020
              port: 5010
 replication  port: 4010
      installation: /home/rubatodb/RubatoDB0_1
   ------------------------------

           Enter y to confirm::  y

----------------------------------------------------------


----------------------------------------------------------
   Node 1:  Replication 0
           Enter the IP address:  10.10.0.2
          Enter the internal port number:
          Enter the replication port number:
            Enter  installation:

   Please confirm the following information
   ------------------------------
        ip_address: 10.10.0.2
       client_port: 0
              port: 5100
 replication  port: 4100
      installation: /home/rubatodb/RubatoDB1_0
   ------------------------------

           Enter y to confirm::  y

----------------------------------------------------------


----------------------------------------------------------
   Node 1:  Replication 1
           Enter the IP address:  10.10.0.2
          Enter the internal port number:
          Enter the replication port number:
            Enter  installation:

   Please confirm the following information
   ------------------------------
        ip_address: 10.10.0.2
       client_port: 0
              port: 5110
 replication  port: 4110
      installation: /home/rubatodb/RubatoDB1_1
   ------------------------------

           Enter y to confirm::  y

----------------------------------------------------------


----------------------------------------------------------
   Node 2:  Replication 0
           Enter the IP address:  10.10.0.2
          Enter the internal port number:
          Enter the replication port number:
            Enter  installation:

   Please confirm the following information
   ------------------------------
        ip_address: 10.10.0.2
       client_port: 0
              port: 5200
 replication  port: 4200
      installation: /home/rubatodb/RubatoDB2_0
   ------------------------------

           Enter y to confirm::  y

----------------------------------------------------------


----------------------------------------------------------
   Node 2:  Replication 1
           Enter the IP address:  10.10.0.2
          Enter the internal port number:
          Enter the replication port number:
            Enter  installation:

   Please confirm the following information
   ------------------------------
        ip_address: 10.10.0.2
       client_port: 0
              port: 5210
 replication  port: 4210
      installation: /home/rubatodb/RubatoDB2_1
   ------------------------------

           Enter y to confirm::  y

----------------------------------------------------------


----------------------------------------------------------
   Node 3:  Replication 0
           Enter the IP address:  10.10.0.2
          Enter the internal port number:
          Enter the replication port number:
            Enter  installation:

   Please confirm the following information
   ------------------------------
        ip_address: 10.10.0.2
       client_port: 0
              port: 5300
 replication  port: 4300
      installation: /home/rubatodb/RubatoDB3_0
   ------------------------------

           Enter y to confirm::  y

----------------------------------------------------------


----------------------------------------------------------
   Node 3:  Replication 1
           Enter the IP address:  10.10.0.2
          Enter the internal port number:
          Enter the replication port number:
            Enter  installation:

   Please confirm the following information
   ------------------------------
        ip_address: 10.10.0.2
       client_port: 0
              port: 5310
 replication  port: 4310
      installation: /home/rubatodb/RubatoDB3_1
   ------------------------------

           Enter y to confirm::  y

----------------------------------------------------------


---------------------------------------------------------------------------------
 Node ID  Replication ID   IP Address  Socket    I-Port   R-Port     Installation Directory
---------------------------------------------------------------------------------
       0        0         10.10.0.2     8010      5000      4000     /home/rubatodb/RubatoDB0_0
       0        1         10.10.0.2     8020      5010      4010     /home/rubatodb/RubatoDB0_1
       1        0         10.10.0.2        0      5100      4100     /home/rubatodb/RubatoDB1_0
       1        1         10.10.0.2        0      5110      4110     /home/rubatodb/RubatoDB1_1
       2        0         10.10.0.2        0      5200      4200     /home/rubatodb/RubatoDB2_0
       2        1         10.10.0.2        0      5210      4210     /home/rubatodb/RubatoDB2_1
       3        0         10.10.0.2        0      5300      4300     /home/rubatodb/RubatoDB3_0
       3        1         10.10.0.2        0      5310      4310     /home/rubatodb/RubatoDB3_1
---------------------------------------------------------------------------------

   Enter y to confirm the info:  y
|
rubatodb> cp -f /home/rubatodb/RubatoDB_dist /home/rubatodb/RubatoDB0_0 rubatodb> cp -f /home/rubatodb/RubatoDB_dist /home/rubatodb/RubatoDB0_1 rubatodb> cp -f /home/rubatodb/RubatoDB_dist /home/rubatodb/RubatoDB1_0 rubatodb> cp -f /home/rubatodb/RubatoDB_dist /home/rubatodb/RubatoDB1_1 rubatodb> cp -f /home/rubatodb/RubatoDB_dist /home/rubatodb/RubatoDB2_0 rubatodb> cp -f /home/rubatodb/RubatoDB_dist /home/rubatodb/RubatoDB2_1 rubatodb> cp -f /home/rubatodb/RubatoDB_dist /home/rubatodb/RubatoDB3_0 rubatodb> cp -f /home/rubatodb/RubatoDB_dist /home/rubatodb/RubatoDB3_1 |
rubatodb> /home/rubatodb/RubatoDB0_0/bin/logicsql -d /home/rubatodb/RubatoDB0_0 -n0 -r0 -c; /home/rubatodb/RubatoDB0_1/bin/logicsql -d /home/rubatodb/RubatoDB0_1 -n0 -r1 -c; /home/rubatodb/RubatoDB1_0/bin/logicsql -d /home/rubatodb/RubatoDB1_0 -n1 -r0 -c; /home/rubatodb/RubatoDB1_1/bin/logicsql -d /home/rubatodb/RubatoDB1_1 -n1 -r1 -c; /home/rubatodb/RubatoDB2_0/bin/logicsql -d /home/rubatodb/RubatoDB2_0 -n2 -r0 -c; /home/rubatodb/RubatoDB2_1/bin/logicsql -d /home/rubatodb/RubatoDB2_1 -n2 -r1 -c; /home/rubatodb/RubatoDB3_0/bin/logicsql -d /home/rubatodb/RubatoDB3_0 -n3 -r0 -c; /home/rubatodb/RubatoDB3_1/bin/logicsql -d /home/rubatodb/RubatoDB3_1 -n3 -r1 -c; ---------------------------------------------- We are creating the new initial database Create the base table files ... Done Create the definition_schema ... Done Create the system user ... Done Create the rubato info schema ... Done Configure the grid distribution ... Done ---------------------------------------------- The system has been created . . . ---------------------------------------------- We are creating the new initial database Create the base table files ... Done Create the definition_schema ... Done Create the system user ... Done Create the rubato info schema ... Done Configure the grid distribution ... Done ---------------------------------------------- The system has been created |
/rubatodb> /home/rubatodb/RubatoDB0_0/bin/start_rubatodb0_0 & /rubatodb> /home/rubatodb/RubatoDB1_0/bin/start_rubatodb1_0 & /rubatodb> /home/rubatodb/RubatoDB2_0/bin/start_rubatodb2_0 & /rubatodb> /home/rubatodb/RubatoDB3_0/bin/start_rubatodb3_0 & /rubatodb> /home/rubatodb/RubatoDB0_1/bin/start_rubatodb0_1 & /rubatodb> /home/rubatodb/RubatoDB1_1/bin/start_rubatodb1_1 & /rubatodb> /home/rubatodb/RubatoDB2_1/bin/start_rubatodb2_1 & /rubatodb> /home/rubatodb/RubatoDB3_1/bin/start_rubatodb3_1 & |
The above example shows how to configure, install, initialize, and then start the RubatoDB server with 4 grids, each of which has 2 replications.
| [ < ] | [ > ] | [ << ] | [ Up ] | [ >> ] | [Top] | [Contents] | [Index] | [ ? ] |
Similar to Manual Installation, after uncompressing the distribution file rubatodb_dist.tar.gz using
Linux> tar -zxvf rubatodb_dist.tar.gz |
the distribution package (under the directory RubatoDB_dist)
contains the following directories and files:
auto_installation.sh
bin
config
data
docs
lib
README
sf_system
tests
The first script file, auto_installation.sh, is used to configure, set-up, initialize, and run the RubatoDB system.
The directories, bin, config, data, lib and sf_system contain the RubatoDB system.
README describes the basic info for the distribution,
and tests contains some of the testing programs.
One simply sing the following to start auto configuration, installation, initialization, and starting of the RubatoDB system:
Linux> cd RubatoDB_dist Linux> ./auto_installation.sh (Then follows the on-screen instruction to finish the whole process.) |
Using the auto installation, one has to make sure that all the pre-installation conditions must be satisfied, as required by the on-screen questions.
| [ < ] | [ > ] | [ << ] | [ Up ] | [ >> ] | [Top] | [Contents] | [Index] | [ ? ] |
Two development tools, the MySQL interactive tool and the JDBC
driver, are contained in
RubatoDB/bin and
RubatoDB/lib respectively,
where RubatoDB is the installation directory of the node.
Note that these two directories are also contained in the distribution
directory RubatoDB_dist.
One may also use the MySQL client package for application development.
The RubatoDB adapts the MySQL communication protocol and thus one may
use the MySQL's JDBC driver for application development.
The JDBC driver is located as RubatoDB_dist/RubatoDB/lib/mysql-connector-java-5.1.35-bin.jar/
To use it in your computer system, being a Linux or Windows,
You should first copy the driver into your system, and
then set up the environment variable CLASSPATH to include the driver.
The mysql is a simple program that runs on many different kinds of computer systems with many different operating systems.
To install mysql in a Linux system, simply copy
RubatoDB_dist/RubatoDB/bin/mysql into /usr/local/bin or any other directory included
in your search path ($PATH).
| [ < ] | [ > ] | [ << ] | [ Up ] | [ >> ] | [Top] | [Contents] | [Index] | [ ? ] |
RubatoDB does not, at this moment, provide any GUI tools for monitoring the database server. However, the meta tables in the definition_schema contain all information about the database server status.
The following statement shows the list of all such meta tables.
mysql> show tables in definition_schema; +-----------------------------+ | Tables_in_definition_schema | +-----------------------------+ | checkpoint_record | | configuration_values | | create_table_stmt | | grid_nodes | | grid_sockets | | index_files | | key_column_usage | | partition_parent | | referential_constraints | | replication_sockets | | replications | | schemata | | sqlstate_message | | system_limitation | | table_constraints | | table_distribution | | table_partitions | | tables | | users | +-----------------------------+ 19 rows in set (0.00 sec) |
For example, the following query displays the current status of all replicaiton nodes, where the values, 1, 2, and 3, of current_status stand for the master, slave, and not-available, respectively.
mysql> select * from definition_schema.replications; +---------+----------------+------------+---------------+-----------------+--------+------------+ | grid_id | replication_id | ip_address | client_socket | internal_socket | status | process_id | +---------+----------------+------------+---------------+-----------------+--------+------------+ | 0 | 0 | 10.10.0.2 | 8010 | 5000 | 1 | 26780 | | 0 | 1 | 10.10.0.2 | 8020 | 5010 | 2 | 27949 | | 1 | 0 | 10.10.0.2 | 0 | 5100 | 1 | 26952 | | 1 | 1 | 10.10.0.2 | 0 | 5110 | 2 | 27072 | | 2 | 0 | 10.10.0.2 | 0 | 5200 | 1 | 27082 | | 2 | 1 | 10.10.0.2 | 0 | 5210 | 2 | 27090 | | 3 | 0 | 10.10.0.2 | 0 | 5300 | 2 | 27092 | | 3 | 1 | 10.10.0.2 | 0 | 5310 | 1 | 27079 | +---------+----------------+------------+---------------+-----------------+--------+------------+ 8 rows in set (0.05 sec) hen |
For another example, the following query displays the number of grid nodes configured for the server is three (3) , and the number of grid nodes that are available at the moment is two (2). That is, the grid_id 2 is not available because its current_status is 0.
mysql> select * from definition_schema.grid_nodes; +---------+------------+-----------+---------------+----------------+ | grid_id | ip_address | grid_name | client_socket | current_status | +---------+------------+-----------+---------------+----------------+ | 0 | 127.0.0.1 | Node0 | 8010 | 1 | | 1 | 127.0.0.1 | Node1 | 0 | 1 | | 2 | 127.0.0.1 | Node2 | 0 | 0 | +---------+------------+-----------+---------------+----------------+ |
The following query shows that the server contains only one database (schema), named mytest, that is distributed over two nodes (0,1). Note that definition_schema and test are two system created databaes.
mysql> select * from definition_schema.schemata; +--------------+-------------------+--------------+---------------------+----------+---------------+ | catalog_name | schema_name | schema_owner | date_created | no_grids | list_of_grids | +--------------+-------------------+--------------+---------------------+----------+---------------+ | def | definition_schema | root | 2017-09-05 05:59:23 | 1 | 0, | | def | mytest | mytest2 | 2017-09-05 06:36:43 | 2 | 0,1, | | def | test | root | 2017-09-05 05:59:23 | 1 | 0, | +--------------+-------------------+--------------+---------------------+----------+---------------+ 3 rows in set (0.02 sec) |
| [ < ] | [ > ] | [ << ] | [ Up ] | [ >> ] | [Top] | [Contents] | [Index] | [ ? ] |
| 3.3.1 System Creation | ||
| 3.3.2 Starting the RubatoDB server | ||
| 3.3.3 Shutting down the RubatoDB server |
| [ < ] | [ > ] | [ << ] | [ Up ] | [ >> ] | [Top] | [Contents] | [Index] | [ ? ] |
After successful installation of RubatoDB in all grid nodes, one has
to create the initial database on all nodes. This can be done by using the
following command in each and every node, assuming the full path name
of the installation directory is /home/user_name/RubatoDB0_0 for
the node:
Linux:> /home/user_name/RubatoDB0_0/bin/logicsql -d /home/user_name/RubatoDB0_0 -c
This will create the initial database system in the data cluster of the current node. This will also automatically create a system user named 'system' with the default password 'manager'.
The initial database will be created independently in each node, and thus, it can be done in any ordering of grid nodes.
| [ < ] | [ > ] | [ << ] | [ Up ] | [ >> ] | [Top] | [Contents] | [Index] | [ ? ] |
You must start the RubatoDB server before anyone can access the database. A simple example below to demo how to start the RubatoDB server.
Assume that you are going to run RubatoDB on four (4) grid nodes, and have configured the system accordingly. Further, all the initial databases have been created as well on all four grid nodes.
Start the RubatoDB using the following command on all our nodes, in the
order of node0, node1, node2, node3, as follows:
Node0 Linux:> /home/user_name/RubatoDB0_0/bin/logicsql -d /home/user_name/RubatoDB0_0 -n0 &
Node1 Linux:> /home/user_name/RubatoDB1_0/bin/logicsql -d /home/user_name/RubatoDB1_0 -n1 &
Node2 Linux:> /home/user_name/RubatoDB2_0/bin/logicsql -d /home/user_name/RubatoDB2_0 -n2 &
Node3 Linux:> /home/user_name/RubatoDB3_0/bin/logicsql -d /home/user_name/RubatoDB3_0 -n3 &
One shall not start the server on Node 1 until the start at Node0 completes, and shall not start the server on Node2 until the start at Node1 completes, and so on so forth.
For each data cluster, only ONE grid node should be started at any time. A separate RubatoDB user account or the corresponding data cluster must be set up if you wish to run two nodes in one computer system.
Command Line Options of logicsql
logicsql is used to create the initial database as well as
start the server. It may also take some command line options, as listed
below. Note that the command line option will override the configuration
values if applicable.
Linux:> logicsql -h

Usage: logicsql [-options]

where options include
   -d                  specify the installation directory name,
   -p <port_number>    specify the port number used by the server,
                       the default is specifed by the configuation file
   -n                  the grid node ID
   -c                  create the initial database
   -r                  display all the output on screen
   -h                  print this message

Linux:>
|
There are several common reasons for the failure.
Some of possible reasons are: the socket is busy with other
applications; the inappropriate setup of environment variables.
Check the log file db_err.log in the log area for details.
| [ < ] | [ > ] | [ << ] | [ Up ] | [ >> ] | [Top] | [Contents] | [Index] | [ ? ] |
The RubatoDB server can be shut down with
an SQL command shutdown
Linux> mysql --host 127.0.0.1 --port 8010 -u root Welcome to the MySQL monitor. Commands end with ; or \g. Your MySQL connection id is 10 Server version: 5.6.23-Rubato DB V4 MySQL Community Server (GPL) Copyright (c) 2000, 2013, Oracle and/or its affiliates. All rights reserved. Oracle is a registered trademark of Oracle Corporation and/or its affiliates. Other names may be trademarks of their respective owners. Type 'help;' or '\h' for help. Type '\c' to clear the current input statement. mysql> shutdown; Query OK, 0 rows affected (0.00 sec) mysql> |
Of course, one may use the provided GUI tool to install, configure, start, and shutdown the RubatoDB
Note that only the system user can shutdown the database
server. Also, one cannot shutdown the server if there exists any
other active connections to the server.
Use the sf_dba to shutdown the server, even if there are other
active connections. However, this must be used with extra precaution.
| [ < ] | [ > ] | [ << ] | [ Up ] | [ >> ] | [Top] | [Contents] | [Index] | [ ? ] |
RubatoDB user account
As with any other server daemon that is connected to the world at large,
it is advisable, though not necessary, to run RubatoDB under a separate
user account. This user
account should only own the data itself that is being managed by
the server, and should not be shared with other daemons.
To add a user account to your system, look for a command useradd or
adduser.
The user name "rubatodb" is often used but by no means required.
| [ < ] | [ > ] | [ << ] | [ Up ] | [ >> ] | [Top] | [Contents] | [Index] | [ ? ] |
Managing database users and their privileges is in concept similar to that of Unix operating systems, but then again not identical enough to not warrant explanation.
| [ < ] | [ > ] | [ << ] | [ Up ] | [ >> ] | [Top] | [Contents] | [Index] | [ ? ] |
There are two groups of database users, that is, a group of system users and a group of database users.
One system user, name root with password 'manager', is created
when the initial database is created.
Note root cannot create any tables without creating and using a schema (or database) as it is not expected for the system user to be used as a developer.
CREATE USER, outlined below.
| [ < ] | [ > ] | [ << ] | [ Up ] | [ >> ] | [Top] | [Contents] | [Index] | [ ? ] |
A database user can be created using the following SQL statement:
CREATE USER user_name [ IDENTIFIED BY 'password string' ] |
If the IDENTIFIED BY 'password string' clause is not specified, the user will be created with the password the same as the user name.
To remove an existing user, use the analog SQL command DROP USER, such as
DROP USER her_account
Note Only a system user can create and/or drop a user, and the system user shall not drop a user when the user is currently accessing the database.
| [ < ] | [ > ] | [ << ] | [ Up ] | [ >> ] | [Top] | [Contents] | [Index] | [ ? ] |
The Alter User statement below assigns (or replaces) a password to a MySQL user account:
ALTER USER user_name IDENTIFIED BY 'password_string'. |
Only a system user or the user itself can change a password of the user account.
| [ < ] | [ > ] | [ << ] | [ Up ] | [ >> ] | [Top] | [Contents] | [Index] | [ ? ] |
There are two approach to recover the root password:
Assume the RubatoDB server of Grid 0 is installed at /home/rubatodb/RubatoDB0_0, the socket port is 8010, and
the Linux user running the server is rubatodb. Then log into the server as user rubatodb and then use the following
to reset the root password:
Linux > /home/rubatodb/RubatoDB0_0/bin/root_recover -p 8010 then follow the screen instruction to enter the new root password. |
| [ < ] | [ > ] | [ << ] | [ Up ] | [ >> ] | [Top] | [Contents] | [Index] | [ ? ] |
The GRANT statement grants privileges to RubatoDB user accounts.
Grant Statement ::= GRANT < priv_type > ON [TABLE] < priv_level > TO user_name [WITH GRANT OPTION] priv_type ::= ALL | SELECT | INSERT | DELETE | UPDATE | CREATE | CREATE_USER | CREATE_VIEW | DROP | ALTER | INDEX priv_level ::= * | *.* | db_name.* | db_name.table_name | table_name |
GRANT ALL ON sarah_db.* TO sarah; GRANT SELECT ON db1.invoice TO sarah; |
The Revoke statement is used to revoke privileges from RubatoDB user accounts.
Revoke Statement ::= REVOKE < priv_type > ON [TABLE] < priv_level > FROM user_name REVOKE ALL [PRIVILEGES], GRANT OPTION FROM User_name |
REVOKE SELECT ON sarah_db.* FROM sarah; REVOKE ALL PRIVILEGS, GRANT OPTION ON FROM sarah; |
| [ < ] | [ > ] | [ << ] | [ Up ] | [ >> ] | [Top] | [Contents] | [Index] | [ ? ] |
RubatoDB adapts the MySQL communication protocol, and therefore, all the development tools of MySQL can be used to access the RubatoDB, including, but not limiting to, the following:
| 4.1 JDBC | ||
| 4.2 PyMySQL | ||
| 4.3 MySQL C API | ||
| 4.4 MySQL Interface |
| [ < ] | [ > ] | [ << ] | [ Up ] | [ >> ] | [Top] | [Contents] | [Index] | [ ? ] |
The JDBC API is a Java API that can access any kind of tabular data, especially data stored in a Relational Database. An introduction to JDBC can be found at https://docs.oracle.com/javase/tutorial/jdbc/overview/index.html
Since RubatoDB adapts MySQL's communication protocol, one can use the MySQL JDBC driver to access RubatoDB servers. A few simple Java sample programs to access RubatoDB are given below.
Note that one Java JDBC driver, mysql-connector-java-5.1.26-bin.jar is contained in the distribution package.
The following java program demonstrates how to connect to RubatoDB server and display an SQL query result set.
Example 19.
import java.io.*;
import java.sql.*;
/**
 *  A simple example to demonstrate how to use JDBC to connect to RubatoDB
 *  @author  Li-Yan Yuan
 *
 *  Compile:   javac SimpleJava.java
 *      Run:   java -cp ./:/usr/share/java/mysql-connector-java-5.1.26-bin.jar SimpleJava
 */
public class SimpleJava {

    public static void main( String[] args)  {

	//  change the following parameters to connect to other databases
	String username = "root";
	String password = "manager";
	String drivername = "com.mysql.jdbc.Driver";
	String dbstring = "jdbc:mysql://127.0.0.1:8010";
	String query;
	int width=30;
	Connection conn;
	try {
	    // to connect to the database
	    conn = getConnected(drivername,dbstring, username,password);
	    System.out.println( "\n\nIt has been connected to the database\n\n");

	    // A simple query
	    query = "SELECT schema_name, date_created, No_grids FROM definition_schema.schemata";
	    System.out.println("Query:  " + query+"\n\n");

	    // Create the JDBC Statement
	    Statement stmt = conn.createStatement();

	    // Execute the given query
	    ResultSet rset = stmt.executeQuery(query);

            // get the meta data of the result set
            ResultSetMetaData rsetMetaData = rset.getMetaData();
            int no_columns = rsetMetaData.getColumnCount();

            // print the label line
            System.out.println();
            for ( int i = 1; i <= no_columns; i++ ) {
                String label = rsetMetaData.getColumnLabel(i);
                System.out.print(label);
                for ( int j = 0; j < width - label.length(); j++ )
                    System.out.print(" ");
            }

            System.out.println();
            for ( int i = 1; i <= no_columns * width; i++ )
                System.out.print("-");
            System.out.println();

            // display the result tuples
            while (rset.next()) {
                for ( int i = 1; i <= no_columns; i++ ) {
                    String s = rset.getString(i);
                    System.out.print(s);
                    for (int j = 0; j < width - s.length(); j++ )
                        System.out.print(" ");
                }
                System.out.println();
            }

	    System.out.println();
            for ( int i = 1; i <= no_columns * width; i++ )
                System.out.print("-");
            System.out.println();
	    System.out.println();

           // close the result set, the statement, and the connection
            rset.close();
            stmt.close();

	    conn.close();
	} catch( Exception ex ) {
	    System.out.print( "Failed to  ");
	    System.out.println( ex.getMessage());
	}
    }

    /*
     *   To connect to the specified database
     */
    private static Connection getConnected( String drivername,
					    String dbstring,
					    String username,
					    String password  )
	throws Exception {
	Class drvClass = Class.forName(drivername);
	DriverManager.registerDriver((Driver) drvClass.newInstance());
	return( DriverManager.getConnection(dbstring,username,password));
    }
}
|
| [ < ] | [ > ] | [ << ] | [ Up ] | [ >> ] | [Top] | [Contents] | [Index] | [ ? ] |
Python is a popular tool for developing database applications, and a commonly used python package, called PyMySQL, can be used to access RubatoDB. Below are some examples demonstrated how to query and update a RubatoDB server using the PyMySQL. See https://pypi.org/project/PyMySQL/ for more details.
Example 20.
#!/usr/bin/python3
#
#  Usage:  python3 sf_test.py
#
import pymysql

# Open database connection
db = pymysql.connect("127.0.0.1","root","manager","sqltest",8010 )

# prepare a cursor object using cursor() method
cursor = db.cursor()

# Prepare SQL query to INSERT a record into the database.
sql = "SELECT date_created,no_grids,schema_name FROM definition_schema.schemata "

print("\n\n     Query:  ", sql,"\n")

try:
   # Execute the SQL command
   cursor.execute(sql)
   # Fetch all the rows in a list of lists.
   results = cursor.fetchall()
   print("  -------------------------------------------------------------------------------------")
   print("    Date_created                   no_grids                     Database Name          ")
   print("  -------------------------------------------------------------------------------------")

   for row in results:
      # print(row)
      # Now print fetched result
      print ("   ",  row[0], "               ", row[1], "                 ", row[2])


   print("  -------------------------------------------------------------------------------------\n")
except:
   print ("Error: unable to fetch data")

# disconnect from server
db.close()
|
Example 21.
#
#  A Python3 program to demonstrate how to
#  (1) create a user and a database of the same name,
#  (2) create a table,
#  (3) insert a new row to a table created, and
#  (4) load a csv file into the newly created table in (2)
#
#  Usage:  python3 sf_loading.py
#
#!/usr/bin/python3
import pymysql

#  Specify the full path of the CSV data file that must be accessible by the RubaoDB server
#  A sample data file is given at the end of this file
csv_file="/home/lyuan/rubatodb.3.0/package3/sf_test/cases1node/pet.txt"

# specify the name of a user name and an sql schema (it is also called database by MySQL)
#
schema_name="sqltest"

#  Define a function to create a user and a schema with the given name
#  It also grants all privileges to the user on the schema of the same name
#
def create_schema(user_name):
    stmt1 = "DROP USER IF EXISTS " + user_name
    stmt2 = "DROP DATABASE IF EXISTS " + user_name
    stmt3 = "CREATE USER " + user_name
    stmt4 = "CREATE DATABASE " + user_name
    stmt5 = "GRANT ALL on "+user_name+".* to " + user_name
    try:
        cursor.execute(stmt1)
        cursor.execute(stmt2)
        cursor.execute(stmt3)
        cursor.execute(stmt4)
        cursor.execute(stmt5)
    except:
        print ("Error: unable to drop/create user/database " + user_name)


#  Open a database connection
db = pymysql.connect("127.0.0.1","root","manager","definiton_schema",8010)
cursor = db.cursor()

#  Set auto commit on
cursor.execute("set autocommit=1")

#  Create an SQL schema  and a user of the given name
create_schema(schema_name)

#  Specify the database to use
cursor.execute("USE " + schema_name)

#  Create a table named pet
#  (This is an example from the MySQL documentation)
create_table_stmt="CREATE TABLE pet ( \
        name    varchar(32) primary key, \
        owner   varchar(64) not null, \
        species varchar(30), \
        sex     char(1), \
        birth   date, \
        death   date \
)"
cursor.execute(create_table_stmt)

# Insert a new row into Table pet
cursor.execute("INSERT INTO pet VALUES('Sarah', 'Sarah', 'goat', 'f', '1979-08-31','2015-02-28')")

# Load a CSV file into the table
load_stmt="LOAD DATA LOCAL INFILE '" + csv_file + "' INTO TABLE pet FIELDS TERMINATED BY ',' LINES TERMINATED BY '\n'"

try:
    cursor.execute(load_stmt)
    print("\n\nthe csv file " + csv_file + "has been loaded into the table pet\n\n")
except:
    print ("Error: unable to load the given csv file")


# disconnect from server
db.close()

#
#  the sample CSV file for this program
#
# Fluffy,Harold,cat,f,1993-02-04,101,,
# Claws,Gwen,cat,m,1994-03-17,202,,
# Buffy,Harold,dog,f,1989-05-13,303,,
# Fang,Benny,dog,m,1990-08-27,404,,
# Bowser,Diane,dog,m,1979-08-31,505,1995-07-29,
# Chirpy,Gwen,bird,f,1998-09-11,606,,
# Whistler,Gwen,bird,f,1997-12-09,707,,
# Slim,Benny,snake,m,1996-04-29,808,,
|
See Sample programs of using PreparedStatement.
| [ < ] | [ > ] | [ << ] | [ Up ] | [ >> ] | [Top] | [Contents] | [Index] | [ ? ] |
The MySQL C API can be used to develop application programs that can access any RubatoDB server directly.
See Accessing: MySQL Database using MySQL C API at http://www.codeproject.com/Articles/34646/Accessing-MySQL-data-base-using-MySQL-C-API, for details.
| [ < ] | [ > ] | [ << ] | [ Up ] | [ >> ] | [Top] | [Contents] | [Index] | [ ? ] |
RubatoDB adapts the MySQL communication protocol and thus to use all
the application development tools of MySQL.
For your convenience, the binary code for Linux of MySQL Interactive
rool mysql is included in the bin directory of the
installation directory.
We show how to use mysql – the MySQL command-line tool, to access the RubatoDB as follows.
Note that we assume that the bin containing mysql is
contained in the search path ($PATH).
mysql, the MySQL interactive tool to access the RubatoDB by
Linux:> mysql --host 127.0.0.1 --port 8020 --user system --database database --password -A Enter password: Welcome to the MySQL monitor. Commands end with ; or \g. Your MySQL connection id is 204 Server version: 5.7.30-0ubuntu0.18.04.1 (Ubuntu) MySQL Community Server (GPL) Copyright (c) 2000, 2021, Oracle and/or its affiliates. Oracle is a registered trademark of Oracle Corporation and/or its affiliates. Other names may be trademarks of their respective owners. Type 'help;' or '\h' for help. Type '\c' to clear the current input statement. mysql> create table mytest (id int, name varchar(100)); Query OK, 0 rows affected (0.25 sec) mysql> insert into mytest values (100, 'be cool'); Query OK, 0 rows affected (0.02 sec) mysql> insert into mytest values (200, 'just do it'); Query OK, 0 rows affected (0.00 sec) mysql> select * from mytest; +-----+-------------+ | id | name | +-----+-------------+ | 100 | be cool | | 200 | just do it | +-----+-------------+ 2 rows in set (0.00 sec) mysql> exit; |
| [ < ] | [ > ] | [ << ] | [ Up ] | [ >> ] | [Top] | [Contents] | [Index] | [ ? ] |
This chapter presents two different types of database tests to facilitate the users to understand the behavior and performance of RubatoDB.
| 5.1 Big Data Load Tests | ||
| 5.2 TPC-C Benchmark Tests |
| [ < ] | [ > ] | [ << ] | [ Up ] | [ >> ] | [Top] | [Contents] | [Index] | [ ? ] |
A simple program, named one_step_loadtest, using MySQL C API, is developed to test the load performance. It can be used to populate a set of records in the CSV format, and then load the csv file into a table.
For example, we are able to load a table of 4 TB, partitioned into 8 grids
distributed over 4 Linux server, in about an hour.
Assume that the installation directory of the grid node 0 (the main
node with the socket connection) is ~/RubatoDB0_0. Then use the
following steps to start the load test.
Linux> cd ~/RubatoDB0_0/bin/ Linux> ./one_step_loadtest -u |
Follow the on-screen instructions to configure and complete the test.
The test will populate the stock table, per TPC_C specificaiton, and thus the data size depends on the number of warehouses.
In the test, one needs to configure the following parameters.
As per TPC-C specification, the CSV data will be 30GB per warehouses. Assume that one is going to conduct the test on 4 Linux servers, connected with 1GB network cards, one may consider the following configuration
With the CSV data size of 3TB, the population will take 48 hours, and the loading will take 4~6 hours.
The following is a screenshot of loading using one_step_loadtest
Linux> bin/one_step_loadtest -u
----------------------------------------------------------
  We are going to conduct the load Test
           Enter the IP address:
          Enter the port number:
               Enter  user name:
                Enter  password:
      Enter the number of nodes:  4
Enter the number of warehouses:  1000

Please confirm the following information
------------------------------
       ip_address: 127.0.0.1
             port: 8010
        user name: tpcone
      no of nodes: 4
 no of warehouses: 1000
------------------------------

Enter y to confirm the info:  y

It has been connected to the RubatoDB server as root

  The RubatoDB server has 4 nodes, and the number of nodes used for testing is 4

----------------------------------------------------------

Populate the CSV files with 1000 warehouses

----------------------------------------------------------
......................................................................................................................
......................................................................................................................
......................................................................................................................
......................................................................................................................
......................................................................................................................
......................................................................................................................
......................................................................................................................
......................................................................................................................
........................................................

All the CSV files are created and stored at the directory /tmp/loadtest_files/

Table stock has been created
----------------------------------------------------------
   Load stock table using csv files in /tmp/loadtest_files and run query to see performance
----------------------------------------------------------
 Query  1: LOAD DATA INFILE '/tmp/loadtest_files/stock.csv' INTO TABLE stock  FIELDS TERMINATED BY ',' LINES TERMINATED BY '\n'
(Load)  100000000 rows in set (435499 millisec)


 Query  2: select count(*) from stock
+----------+
| count(*) |
+----------+
|100000000 |
+----------+
 1 rows in set (50474 millisec)


 Query  3: select * from stock where s_w_id=1 and s_i_id=1000
+--------------------------------------------------------------------------------------------------------------+
| s_w_id | s_i_id | s_quantity |     s_dist_01           |  ...  | s_ytd | s_order_cnt | s_remote_cnt | s_data |
+--------------------------------------------------------------------------------------------------------------+
|      1 |   1000 |         58 |mbpqpheustdeqqytpdyniubz |  ...  |     0 |           0 |            0 |ldxjf...|
+--------------------------------------------------------------------------------------------------------------+

 1 rows in set (2 millisec)


 Query  4: select count(*) from stock where s_w_id=1 and s_i_id>1000
+----------+
| count(*) |
+----------+
|    99000 |
+----------+
 1 rows in set (169 millisec)


 Query  5: select count(*), max(s_i_id),sum(s_quantity)  from stock
+------------------------------------------+
| count(*) | max(s_i_id) | sum(s_quantity) |
+------------------------------------------+
|100000000 |      100000 |      5500316360 |
+------------------------------------------+
 1 rows in set (69427 millisec)


 Query  6: select count(*), max(s_i_id),sum(s_quantity),s_w_id  from stock group by s_w_id
+---------------------------------------------------+
| count(*) | max(s_i_id) | sum(s_quantity) | s_w_id |
+---------------------------------------------------+
|   100000 |      100000 |         5495286 |      1 |
|   100000 |      100000 |         5507308 |      5 |
|   100000 |      100000 |         5486376 |      9 |
|                                                   |
|        ...                                        |
|                                                   |
+---------------------------------------------------+
 1000 rows in set (122437 millisec)


 Query  7: select count(*), max(s_i_id),sum(s_quantity),s_w_id  from stock group by s_w_id  having sum(s_quantity) <5500000
+---------------------------------------------------+
| count(*) | max(s_i_id) | sum(s_quantity) | s_w_id |
+---------------------------------------------------+
|   100000 |      100000 |         5495286 |      1 |
|   100000 |      100000 |         5486376 |      9 |
|   100000 |      100000 |         5497697 |     13 |
|                                                   |
|        ...                                        |
|                                                   |
+---------------------------------------------------+
 484 rows in set (130158 millisec)


 Query  8: select count(*) from stock where s_w_id <=s_i_id
+----------+
| count(*) |
+----------+
| 99500500 |
+----------+
 1 rows in set (61473 millisec)


 Query  9: select count(*) from stock where s_w_id <s_i_id or s_w_id >s_i_id
+----------+
| count(*) |
+----------+
| 99999000 |
+----------+
 1 rows in set (76051 millisec)


 Query 10: select s_w_id+s_i_id,sum(s_quantity) from stock group by s_w_id+s_i_id
+---------------------------------+
| s_w_id+s_i_id | sum(s_quantity) |
+---------------------------------+
|             2 |              81 |
|             3 |             116 |
|             4 |             204 |
|                                 |
|        ...                      |
|                                 |
+---------------------------------+
 100003 rows in set (156311 millisec)


 Query 11: select s_w_id,s_i_id,s_quantity,s_dist_01,s_ytd,s_order_cnt,s_remote_cnt from stock
+---------------------------------------------------------------------------------------------+
| s_w_id | s_i_id | s_quantity |               s_dist_01 | s_ytd | s_order_cnt | s_remote_cnt |
+---------------------------------------------------------------------------------------------+
|      1 |      1 |         81 |jihujsdbyamkwygzrxphzoab |     0 |           0 |            0 |
|      1 |      2 |         17 |wksghxubfbeqvpnerkekfpyp |     0 |           0 |            0 |
|      1 |      3 |         97 |uindhmomokobneomjpdhnnnm |     0 |           0 |            0 |
|                                                                                             |
|                    ...                                                                      |
|                                                                                             |
+---------------------------------------------------------------------------------------------+
 400000 rows in set (200 millisec)
|
One may use the following
Linux> ./one_step_loadtest -h |
to see how to use command line options to fine tune the test.
| [ < ] | [ > ] | [ << ] | [ Up ] | [ >> ] | [Top] | [Contents] | [Index] | [ ? ] |
The TPC-C benchmark test is a comprehensive database benchmark test that continues to be a popular yardstick for comparing OLTP performance on various hardware and software configurations. (see http://www.tpc.org for details).
Similar to the big data load test, we also provide a program, named
one_step_tpctest, to conduct the TPC-C benchmark test over any number of nodes.
The program is contained in the directory of ~/RubatoDB0_0/bin, where ~/RubatoDB0_0 refers to the
installation directory on Grid 0. To use this testing program, one needs to specify the following, using
the command-line option or its interactive interface, among other things:
For example, assume that the RubatoDB server is configured as four (4) grid nodes with the client sockets port 8010 at the server
129.128.255.123. Further assume that the password of the root is 'manager'. To conduct the standard TPC-C test with 1000 warehouses on the server distributed into 4 grid nodes, one only needs to issue the following command:
Linux> RubatoDB_dist/bin/one_step_tpctest -g4 -m 129.128.255.123 -p 8010 -w1000 -b manager |
Where RubatoDB_dist/bin is the directory contains the testing program one_step_tpctest.
The testing will take around 4~5 hours, and will display the summary of the testing, as shown below, and many other information.
[9]   TEST SUMMARY
     -----------------------------------------------------------------------

              Number of RubatoDB Grids:       4
                     Number of Servers:       2
                  Number of Warehouses:    1000
          Number of Concurrent Clients:   10000
     Number of Transactions per Minute:   27448

                                  tpmC:   12351

     ---------------------------------------------------------
|
One may use the following
Linux> ./one_step_tpctest -h |
to see how to use command line options to fine tune the test.
To demonstrate how to use this testing program, a complete output of the testing is given below. Note that the RubatoDB server is installed in a Dell laptop with Intel i7 8th generation CPU, 16Gb Memory. The server is configured with 2 grids, and the connecting port is 8010.
Linux>  /home/lyuan/RubatoDB0_0/bin/one_step_test -g2 -w400

-------------  Records of the TPC-C Test using one_step_tpctest  ----------

[1]  Database 'tpcone' and User 'tpcone' have been created

[2]  We are going to use the CSV files stored in '/mnt/storage/lyuan/tmp/tpctest400'

[3]  All 12 TPC tables have been created using SQL file 'setup.sql'

[4]  The following tables will be loaded
      item, warehouse, district, stock2, customer2, history,
      orders, new_order, order_line, stock1, customer1, customer3,

[5]  Start the TPC-C Test with 2 grids, 400 warehouses, 4000 clients, in around 150 minutes
       1 .........  20.........  40.........  60.........  80......... 100
         ......... 120......... 140......... 160......... 180......... 200
         ......... 220......... 240......... 260......... 280......... 300
         ......... 320......... 340......... 360......... 380......... 400
                          .  .  .
         ......... 320......... 340......... 360......... 380......... 400
      10 .........  20.........  40.........  60.........  80......... 100
         ......... 120......... 140......... 160......... 180......... 200
         ......... 220......... 240......... 260......... 280......... 300
         ......... 320......... 340......... 360......... 380......... 400
        All 4000 clients have been connected into the testing server

      ..................................................
      ............................................

    Now waiting for all clients (threads) to finish, one at a time ---------
     1.  ...................................................
         ..................................................
         ..................................................
                          .  .  .
    10.  ..................................................
         .................................................
             ( All Clients' Test have been done )

[6]    Retrieve the Checkpoint Records
+--------------------------------------------------------------------------------------------------+
| chk_time            | clients | transaction_id | roll_backs | committed | transaction_per_minute |
+--------------------------------------------------------------------------------------------------+
| 2021-04-24 17:31:59 |       2 |             70 |          0 |         0 |                      0 |
| 2021-04-24 17:47:13 |    4001 |         118257 |        119 |    108048 |                   7100 |
| 2021-04-24 18:17:15 |    4001 |         446281 |        620 |    329145 |                  10979 |
| 2021-04-24 18:47:16 |    4001 |         772369 |        668 |    325495 |                  10866 |
| 2021-04-24 19:17:29 |    4001 |        1103387 |        672 |    328441 |                  10891 |
| 2021-04-24 19:47:30 |    3988 |        1430659 |        678 |    328457 |                  10965 |
| 2021-04-24 20:17:30 |      82 |        1611424 |        212 |    176854 |                   5902 |
| 2021-04-24 20:27:20 |       2 |        1612095 |          0 |       585 |                     59 |
+--------------------------------------------------------------------------------------------------+

[7]   Notes to the checkpoint records displayed in [6]
    ----------------------------------------------------------
    Note that each row represents the testing data extracted from the last 30 minutes (between two chk_times)
    Thus the Testing Result can be characterized by the last column, transaction_per_minute,  of any row R, if
     (1) clients[R] is larger than 4000, and
     (2) clients[Rp], where Rp is the previous row of R, is also larger than 4000
    Assum that R is choosen such that transaction_per_minute[R] = 10800,
    By the TPC-C standard,  tpmC of the testing is  4860, that is 45% of 10800.
    This is because tpmC is specified as the number of New-Order transactions conducted during 30 minutes,
    while the number of New-Order transactions must be 45% of all transactions.
    ----------------------------------------------------------

[8]  Conduct the TPC-Check to see if all 10 conditions are satisfied.
     The total number of warehouses is 400

    Test Conditions 1, 8, and 9:
    Consistency Condition 1 is satisfied
    Consistency Condition 8 is satisfied
    Consistency Condition 9 is satisfied

    Test Condition 11:
    Consistency condition 11 is satisfied

    Test Conditions 2 and 3:
    Consistency Condition 2 is satisfied
    Consistency Condition 3 is satisfied

    Test Condition 4:
    Consistency Condition 4 is satisfied

    Test Conditions 5 and 7
    Consistency Condition 5 is satisfied
    Consistency Condition 7 is satisfied

    Test Condition 6: It may take a while.
    Consistency Condition 6 is satisfied

    Test Conditions 10 and 12: this may take quite a while.
    Consistency Condition 10 is satisfied
    Consistency Condition 12 is satisfied


[9]   TEST SUMMARY
     -----------------------------------------------------------------------

              Number of RubatoDB Grids:      2
                     Number of Servers:      2
                  Number of Warehouses:    400
          Number of Concurrent Clients:   4000
     Number of Transactions per Minute:  10979

                                  tpmC:   4940

     ---------------------------------------------------------

[10]  Displays the Grid and Replication Info

+---------------------------------------+
| grid_id | replication_id | ip_address |
+---------------------------------------+
|       0 |              0 |  127.0.0.1 |
|       1 |              0 |  127.0.0.1 |
+---------------------------------------+
|
| [ < ] | [ > ] | [ << ] | [ Up ] | [ >> ] | [Top] | [Contents] | [Index] | [ ? ] |
We have conducted extensive experiments of RubatoDB which clearly show that RubatoDB is highly scalable with ACID under the TPC-C benchmark tests. Our experiments using the YCSB benchmark also demonstrate that the performance of RubatoDB is comparable with some popular big data systems based on the MapReduce framework that supports only the BASE properties.
The figure below demonstrates that the performance (tpmC) of the TPC-C benchmark test of RubatoDB, from 25,000 concurrent clients running on 1 server, to 320,000 concurrent clients running on a collection of 16 commodity servers.
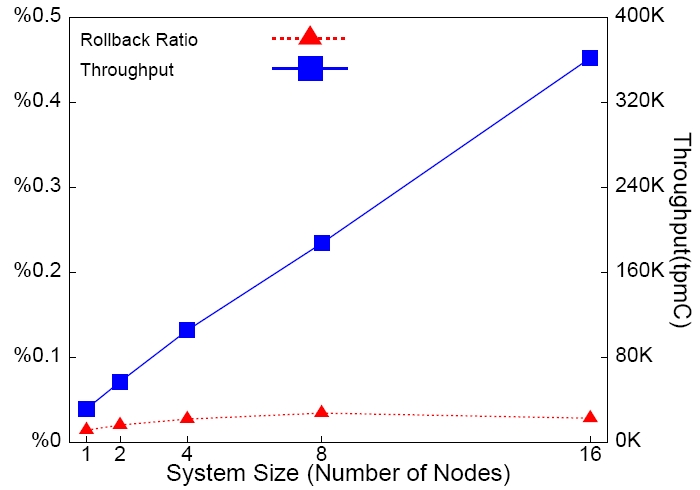
The figure clearly shows that under the TPC-C benchmark test, the performance of RubatoDB scales up linearly with the increase of the number of servers used.
The following figure compares the performance of RubatoDB with three other popular key-store systems, in terms of the number of throughput, a standard performance measurement of the YCSB benchmark.

From the graphics, we can see that the performance of RubatoDB is comparable with these big data systems that only support the BASE properties.
| [ < ] | [ > ] | [ << ] | [ Up ] | [ >> ] | [Top] | [Contents] | [Index] | [ ? ] |
| [ < ] | [ > ] | [ << ] | [ Up ] | [ >> ] | [Top] | [Contents] | [Index] | [ ? ] |
| [ < ] | [ > ] | [ << ] | [ Up ] | [ >> ] | [Top] | [Contents] | [Index] | [ ? ] |
we will show you how to check your current limit of open files and files descriptions, but to do so, you will need to have root access to your system. (Based on the tutorial at https://www.tecmint.com/increase-set-open-file-limits-in-linux.)
First, use the following to find out the maximum number of opened file descriptors on your Linux system.
Linux> cat /proc/sys/fs/file-max
1598203
The number you will see, shows the number of files that a user can have opened per login session. The result might be different depending on your system.
Set User Level Open File limits in Linux
To set the open file limit of a user user_id to 393216, one needs to edit the following three files
to include the given line(s).
/etc/security/limits.conf
user_id soft nofile 393216 user_id hard nofile 393216
/etc/systemd/system.conf
DefaultLimitNOFILE=393216
/etc/systemd/user.conf
DefaultLimitNOFILE=393216
| [ < ] | [ > ] | [ << ] | [ Up ] | [ >> ] | [Top] | [Contents] | [Index] | [ ? ] |
| Jump to: | A B C D H L P R S T U |
|---|
| Index Entry | Section | |
|---|---|---|
| | ||
| A | ||
| Appendix | 8. Appendix | |
| | ||
| B | ||
| Big Data Load Tests | 5.1 Big Data Load Tests | |
| | ||
| C | ||
| create sequence | 2.5 Create Sequence | |
| creation of the initial database | 3.1.2 Manual Installation | |
| | ||
| D | ||
| data area | 3.1.2 Manual Installation | |
| data cluster | 3.1.2 Manual Installation | |
| data configuration | 3.1.2 Manual Installation | |
| Database Tests | 5. Database Tests | |
| drop sequence | 2.5 Create Sequence | |
| | ||
| H | ||
| How to Increase Number of Open Files Limit | 8.1 How to Increase Number of Open Files Limit | |
| | ||
| L | ||
| lob cluster | 3.1.2 Manual Installation | |
| lobs area | 3.1.2 Manual Installation | |
| logicsql | 3.3.2 Starting the RubatoDB server | |
| | ||
| P | ||
| Performance | 6. Performance | |
| | ||
| R | ||
| References | 7. References | |
| | ||
| S | ||
| server | 3.3.2 Starting the RubatoDB server | |
| server shut down | 3.3.3 Shutting down the RubatoDB server | |
| server startup failures | 3.3.2 Starting the RubatoDB server | |
| Shutting down the RubatoDB server | 3.3.3 Shutting down the RubatoDB server | |
| special considerations | 2.6 Special Considerations | |
| Starting the RubatoDB server | 3.3.2 Starting the RubatoDB server | |
| starting the RubatoDB server | 3.1.2 Manual Installation | |
| system creation | 3.3.1 System Creation | |
| | ||
| T | ||
| TPC-C Benchmark Tests | 5.2 TPC-C Benchmark Tests | |
| tutorials | 2.7 Tutorials | |
| | ||
| U | ||
| user account | 3.4 Server Runtime Environment | |
| | ||
| Jump to: | A B C D H L P R S T U |
|---|
| [ < ] | [ > ] | [ << ] | [ Up ] | [ >> ] | [Top] | [Contents] | [Index] | [ ? ] |
Please report all the bugs by sending emails to
lyuan@ualberta.ca
| [Top] | [Contents] | [Index] | [ ? ] |
| [Top] | [Contents] | [Index] | [ ? ] |
This document was generated by Li Yan Yuan on April 24, 2021 using texi2html 1.82.
The buttons in the navigation panels have the following meaning:
| Button | Name | Go to | From 1.2.3 go to |
|---|---|---|---|
| [ < ] | Back | Previous section in reading order | 1.2.2 |
| [ > ] | Forward | Next section in reading order | 1.2.4 |
| [ << ] | FastBack | Beginning of this chapter or previous chapter | 1 |
| [ Up ] | Up | Up section | 1.2 |
| [ >> ] | FastForward | Next chapter | 2 |
| [Top] | Top | Cover (top) of document | |
| [Contents] | Contents | Table of contents | |
| [Index] | Index | Index | |
| [ ? ] | About | About (help) |
where the Example assumes that the current position is at Subsubsection One-Two-Three of a document of the following structure:
This document was generated by Li Yan Yuan on April 24, 2021 using texi2html 1.82.