AWT/Swing Tutorial
by John Anvik
This tutorial gives a brief overview of working with AWT and Swing. This is by no means a comprehensive overview of both widget sets, and is restricted to elements used in applets. The reader is encouraged to explore other components of the two widget sets, especially for Swing. As this tutorial is restricted to applets, frames and widgets that are attached to frames (such as menus and dialog boxes) are not covered.
A common applet example is used for both the AWT and Swing portions. This is an applet that is used to place either a "For Sale" or a "Wanted" advertisment for a car.
AWT
We start with the by creating the applet class. As we
will be adding buttons to the applet we implement the ActionListener interface:
import
java.awt.*;
import
java.awt.event.*;
import
java.applet.*;
public
class AWT extends Applet implements ActionListener {
}
Next we create declare all the objects that we will
be creating for the applet:
private Button buy, sell;
private Label title, emailLabel,
commentsLabel,
makeLabel, colourLabel, optionsLabel,
yearLabel;
private Choice make, year;
private Checkbox seatbelt, radio, roof,
doors;
private CheckboxGroup colours;
private Checkbox red, blue, green, black;
private Panel colourPanel, optionsPanel, buttonPanel,
commentsPanel, emailPanel, makePanel,
imagePanel, yearPanel;
private TextArea comments, order;
private TextField email;
We now create the applet's init() method which will
contain all the instantiation and initialization of the components of the
applet:
public void init(){
(Note: All the following statements
are added to the init( ) method)
First let us set up the layout of the applet. I chose
the GridLayout as it is the simplist, being just a table:
setLayout(new GridLayout(10,0));
We now set the fonts that we will be using in applet:
/* Fonts */
Font titleFont = new
Font("TimesRoman",Font.BOLD,36);
Font dataFont = new
Font("TimesRoman",Font.ITALIC,18);
Font orderFont = new
Font("TimesRoman",Font.PLAIN,24);
Next comes the labels for the various elements of the
applet:
/* Label */
title = new Label("John's Car
Lot",Label.CENTER);
title.setFont(titleFont);
add(title);
Lets add an image next. Adding images to an applet in
AWT is more complicated than in Swing (as we will later see). The easiest way I
found to do it is to create a new component (ImagePanel) that can be used to
draw the image and then add the new component to the applet like any other AWT
widget:
/* Image */
ImagePanel image = new
ImagePanel("car.gif");
imagePanel = new Panel();
imagePanel.add(image);
add(imagePanel);
Here is the ImagePanel class. Either create it as a
seperate class or as an inner class to the AWT applet.:
class ImagePanel extends Canvas {
Image i;
public ImagePanel(String file){
i =
getImage(getCodeBase(),file);
MediaTracker m = new MediaTracker(this);
m.addImage(i,0);
try{
m.waitForID(0);
}catch(Exception e){};
setSize(i.getWidth(null),i.getHeight(null));
}
public void paint(Graphics g){
g.drawImage(i,0,0,this);
}
}
Now we will add choice boxes for the make and year of
the car:
/* Choice (Combo Boxes) */
make = new Choice();
make.add("Ford");
make.add("Toyota");
make.add("Honda");
make.add("Saturn");
make.add("Mazda");
make.add("Nissan");
makeLabel = new Label("Make: ");
makeLabel.setFont(dataFont);
makePanel = new Panel();
makePanel.add(makeLabel);
makePanel.add(make);
add(makePanel);
year = new Choice();
year.add("1999");
year.add("2000");
year.add("2001");
year.add("2002");
year.add("2003");
yearLabel = new Label("Year: ");
yearPanel = new Panel();
yearPanel.add(yearLabel);
yearPanel.add(year);
add(yearPanel);
Next comes the radiobuttons for the colour of the
car:
/* radiobuttons */
colours = new CheckboxGroup();
red = new
Checkbox("Red",colours,true);
blue = new
Checkbox("Blue",colours,false);
green = new
Checkbox("Green",false,colours);
black = new
Checkbox("Black",false,colours);
colourLabel = new Label("Colour:
");
colourLabel.setFont(dataFont);
colourPanel = new Panel();
colourPanel.add(colourLabel);
colourPanel.add(red);
colourPanel.add(blue);
colourPanel.add(green);
colourPanel.add(black);
add(colourPanel);
Now we will add check boxes for optional elements of
the car:
/* Check Boxes */
seatbelt = new
Checkbox("Seatbelt",true);
radio = new
Checkbox("Radio",false);
doors = new
Checkbox("Doors",false);
roof = new
Checkbox("Roof",true);
optionsLabel = new Label("Options:
");
optionsLabel.setFont(dataFont);
optionsPanel = new Panel();
optionsPanel.add(optionsLabel);
optionsPanel.add(seatbelt);
optionsPanel.add(radio);
optionsPanel.add(roof);
optionsPanel.add(doors);
add(optionsPanel);
Next comes the text boxes for comments, the email
address, and the text of add:
/* Text Boxes and Fields */
comments = new
TextArea("",3,40,TextArea.SCROLLBARS_NONE);
commentsLabel = new Label("Comments:
");
commentsLabel.setFont(dataFont);
commentsPanel = new Panel();
commentsPanel.add(commentsLabel);
commentsPanel.add(comments);
add(commentsPanel);
email = new TextField(40);
emailLabel = new Label("Email
address: ");
emailLabel.setFont(dataFont);
emailPanel = new Panel();
emailPanel.add(emailLabel);
emailPanel.add(email);
add(emailPanel);
order = new
TextArea("",3,40,TextArea.SCROLLBARS_NONE);
order.setFont(dataFont);
order.setEditable(false);
add(order);
Finially we will add the buttons that allow the user
to say whether they are looking to buy the specified car, or are selling the
specified car:
/* Buttons */
buy = new Button("Buy");
sell = new Button("Sell");
buy.addActionListener(this);
sell.addActionListener(this);
buttonPanel = new Panel();
buttonPanel.add(buy);
buttonPanel.add(sell);
add(buttonPanel);
Now that all the applet components have been added,
we need to specify the actions for the two buttons. This is done by specifying
the actionPerformed() method:
public void actionPerformed(ActionEvent
event){
}
(Note: All the following statements
are added to the actionPerformed( ) method)
The first thing to do is figure out which button was
pressed by getting the name of the pressed button:
String action = event.getActionCommand();
As we are creating a the text for the advertisment,
we must create a String object:
String orderStr = new String();
Now let us extract the information from the make,
colour, and year widgets:
Checkbox selectedColour =
colours.getSelectedCheckbox();
String colourStr = selectedColour.getLabel();
String makeStr = make.getSelectedItem();
String yearString =
year.getSelectedItem();
We now start creating our advertisment text and add
the extracted information:
orderStr += "You ";
if(action.equals("Buy")){
orderStr += "have looking for ";
}
if(action.equals("Sell")){
orderStr += "are selling ";
}
orderStr += "a " +
colourStr.toLowerCase() + " " + yearString
+ " " + " " + makeStr + " with ";
Now we check to see what options have been selected
for the car:
if(seatbelt.getState()) orderStr +=
"seatbelts, ";
if(radio.getState()) orderStr += "a
radio, ";
if(roof.getState()) orderStr += "a
roof, ";
if(doors.getState()) orderStr +=
"doors. ";
Depending on if the email address was given and if
comments were provided, we add these to the advertisment text:
if(!(comments.getText()).equals("")){
orderStr += "You further commented that \"" +
comments.getText()
+ "\".";
}
if(!(email.getText()).equals("")){
orderStr += "You can be reached at " + email.getText();
}
Finially, we place the advertisment text in the
specified box so that the user can see it:
order.setText(orderStr);
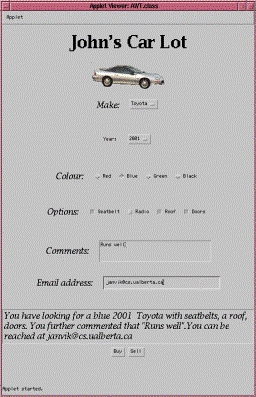
We now have our advertisment applet:
Swing
Creating a Swing applet is similar to an AWT applet,
expect that the class used is JApplet (a subclass of java.awt.Applet). As many
of the Swing components are built out of or on top of AWT components, we need
to include some of the AWT packages. Also, as we will also have buttons in the
Swing applet, the applet implements the ActionListener interface:
import
javax.swing.*;
import
java.awt.event.*;
import
java.awt.*;
public
class Swing extends JApplet implements ActionListener {
}
Similar to the AWT applet created previously, we
declare all the Swing components that we will be using. A few changes to the
previous example are that we will be having a tabbed layout and the year choice
box from the AWT example will be a slider. For the most part, the widget names
are the same as in AWT, but with a "J" prefix. Note that
java.awt.Choice is now javax.swing.JComboBox and java.awt.CheckBox is now
javax.swing.RadioButton in the case of the colour choice, and that some other
variables have been added:
private JButton buy, sell, fc;
private JLabel title, emailLabel, commentsLabel,
makeLabel, colourLabel, optionsLabel,
imageLabel, yearLabel;
private JComboBox make;
private JCheckBox seatbelt, radio, roof,
doors;
private JRadioButton red, blue, green,
black;
private ButtonGroup colours;
private JPanel addPanel, descPanel,
colourPanel,
optionsPanel, buttonPanel,
commentsPanel, emailPanel,
makePanel,yearPanel;
private JTextArea comments, order;
private JTextField email;
private boolean hasSeatbelts, hasRadio,
hasRoof, hasDoors;
private String colourStr =
"Red";
private JSlider year;
private JTabbedPane tabs;
Again we start by overridding the init() method:
public void init(){
}
(Note: All the following statements
are added to the init( ) method)
In Swing, to add components to applet, we need to get
the container object of the applet:
Container pane = getContentPane();
We initialize the boolean variables that will be used
with the car options:
hasSeatbelts = hasRadio = hasRoof =
hasDoors = false;
Similar to the AWT example, we create some panels,
set the layout (in this case for only one of the panels), and create the font
objects that we will use:
/* Panels */
colourPanel = new JPanel();
optionsPanel = new JPanel();
buttonPanel = new JPanel();
commentsPanel = new JPanel();
emailPanel = new JPanel();
makePanel = new JPanel();
yearPanel = new JPanel();
addPanel = new JPanel();
descPanel = new JPanel();
/* Layout */
addPanel.setLayout(new GridLayout(10,0));
/* Fonts */
Font titleFont = new
Font("TimesRoman",Font.BOLD,36);
Font dataFont = new
Font("TimesRoman",Font.ITALIC,18);
Font orderFont = new
Font("TimesRoman",Font.PLAIN,24);
Now we start to add the various components, starting
with the labels:
/* Labels */
title = new JLabel("John's Car
Lot",JLabel.CENTER);
title.setFont(titleFont);
title.setLocation(0,0);
addPanel.add(title);
Remember how we had to create a new component to add
an image in the AWT example? Adding an image to a Swing applet is much easier
as the JLabel can be created using the image:
ImageIcon image = new
ImageIcon("car.gif");
imageLabel = new JLabel(image);
addPanel.add(imageLabel);
Next comes the widget for specifying the make of the
car. In AWT this was a Choice object, in Swing it is a JComboBox object:
/* Choice/Combo Boxes */
makeLabel = new JLabel("Make:
");
makeLabel.setFont(dataFont);
make = new JComboBox();
make.addItem("Ford");
make.addItem("Toyota");
make.addItem("Honda");
make.addItem("Saturn");
make.addItem("Mazda");
make.addItem("Nissan");
makePanel.add(makeLabel);
makePanel.add(make);
addPanel.add(makePanel);
In this applet we are going to change the year
component from a combo box to a slider by creating a JSlider object:
/* Slider */
yearLabel = new JLabel("Year:
");
yearLabel.setFont(dataFont);
year = new JSlider(1999,2003,2001);
year.setMajorTickSpacing(2);
year.setMinorTickSpacing(1);
year.setPaintTicks(true);
year.setPaintLabels(true);
yearPanel.add(yearLabel);
yearPanel.add(year);
addPanel.add(yearPanel);
Now add the radiobuttons. In AWT we created
radiobuttons by placing Checkboxes in a Checkbox group. In Swing, checkboxes
and radiobuttons are seperate components. Also, RadioButton components need to
be grouped together in a ButtonGroup to behave properly:
/* radiobuttons */
colours = new ButtonGroup();
ActionListener rlistener = new
RadioListener();
red = new
JRadioButton("Red",true);
blue = new
JRadioButton("Blue",false);
green = new
JRadioButton("Green");
black = new JRadioButton("Black");
red.addActionListener(rlistener);
blue.addActionListener(rlistener);
green.addActionListener(rlistener);
black.addActionListener(rlistener);
colours.add(red);
colours.add(blue);
colours.add(green);
colours.add(black);
colourPanel.add(colourLabel);
colourPanel.add(red);
colourPanel.add(blue);
colourPanel.add(green);
colourPanel.add(black);
colourLabel = new JLabel("Colour:
");
colourLabel.setFont(dataFont);
addPanel.add(colourPanel);
Unlike in AWT where we called a method to find out which
radiobutton was on, in Swing we need to specify a radiobutton listener that
will set a variable to indicate the state, and add this listener to the
radiobuttons. Here is the ActionListener class for these radiobuttons:
class RadioListener implements
ActionListener {
public void actionPerformed(ActionEvent e)
{
colourStr = e.getActionCommand().toLowerCase();
}
}
Now we add the check boxes for the car options:
/* Check Boxes */
ActionListener cblistener = new
CheckBoxListener();
seatbelt = new
JCheckBox("Seatbelt",true);
radio = new
JCheckBox("Radio",false);
doors = new
JCheckBox("Doors",false);
roof = new
JCheckBox("Roof",true);
seatbelt.addActionListener(cblistener);
radio.addActionListener(cblistener);
doors.addActionListener(cblistener);
roof.addActionListener(cblistener);
optionsPanel.add(optionsLabel);
optionsPanel.add(seatbelt);
optionsPanel.add(radio);
optionsPanel.add(roof);
optionsPanel.add(doors);
optionsLabel = new JLabel("Options:
");
optionsLabel.setFont(dataFont); addPanel.add(emailPanel);
addPanel.add(optionsPanel);
Similar to radiobuttons, we need to create and add an
ActionListener for the check boxes:
class CheckBoxListener implements
ActionListener {
public void actionPerformed(ActionEvent e)
{
String option = e.getActionCommand();
if(option.equals("Radio"))
hasRadio = true;
if(option.equals("Seatbelt"))
hasSeatbelts = true;
if(option.equals("Door"))
hasDoors = true;
if(option.equals("Roof"))
hasRoof = true;
}
}
Next comes the text boxes and buttons. For the
buttons we are going to add tooltips to let the user know what each button
does:
/* Text Boxes */
email = new JTextField(40);
emailPanel.add(emailLabel);
emailPanel.add(email);
emailLabel = new JLabel("Email
address: ");
emailLabel.setFont(dataFont);
comments = new
JTextArea("",10,20);
commentsPanel.add(commentsLabel);
commentsPanel.add(comments);
commentsLabel = new JLabel("Comments:
");
commentsLabel.setFont(dataFont);
addPanel.add(commentsPanel);
order = new JTextArea("",10,20);
order.setEditable(false);
order.setFont(dataFont);
order.setEditable(false);
order.setLineWrap(true);
descPanel.add(order);
/* Buttons */
buy = new JButton("Buy");
sell = new JButton("Sell");
fc = new JButton("Files");
buy.addActionListener(this);
buy.setToolTipText("Buy the specified
car");
sell.addActionListener(this);
sell.setToolTipText("Sell the
specified car");
buttonPanel.add(buy);
buttonPanel.add(sell);
addPanel.add(buttonPanel);
In the AWT example, we had the text for the
advertisment placed in textbox under the buttons. In this example, we are going
to put the text onto a different screen in the applet. This is accomplished by
creating a set of tabs (two of them for this example) that the two panels
(addPanel and descPanel) are placed on. The JTabbedPane is then added to the
applet pane:
tabs = new JTabbedPane();
tabs.addTab("Create
Add",addPanel);
tabs.addTab("Advertisment",descPanel);
pane.add(tabs);
As with the AWT example, we must specify the actions
of the buttons:
public void actionPerformed(ActionEvent
event){
}
(Note: All the following statements
are added to the actionPerformed( ) method)
This time we are going to have the user confirm that
they want to place the advertisment. The JOptionPane component provides a quick
and easy way to produce this type of dialog box. Depending on if the user is
happy with the add, we either go ahead and create the add text, or do nothing:
int confirm = JOptionPane.showConfirmDialog(this,
"Do you want to place this
add?",
"Car Advertisment",
JOptionPane.YES_NO_OPTION);
if(confirm == JOptionPane.YES_OPTION){
JOptionPane.showMessageDialog(this,
"Add has been placed",
"Add
confirmation",
JOptionPane.INFORMATION_MESSAGE);
}else{
JOptionPane.showMessageDialog(this,
"Add has been canceled",
"Add cancelation",
JOptionPane.WARNING_MESSAGE);
return;
}
The rest of the method is similar to
actionPerformed() method we used in the AWT example:
String action = event.getActionCommand();
String orderStr = new String();
String makeStr =
(String)make.getSelectedItem();
orderStr += "You ";
if(action.equals("Buy")){
orderStr += "are looking for ";
}
if(action.equals("Sell")){
orderStr += "are selling ";
}
orderStr += "a " +
year.getValue() + " " + colourStr.toLowerCase()
+ " " + makeStr + " with ";
if(seatbelt.isSelected()) orderStr +=
"seatbelts, ";
if(radio.isSelected()) orderStr += "a
radio, ";
if(roof.isSelected()) orderStr += "a
roof, ";
if(doors.isSelected()) orderStr +=
"doors. ";
if(!(comments.getText()).equals("")){
orderStr += "You further commented that \"" +
comments.getText() +
"\". ";
}
if(!(email.getText()).equals("")){
orderStr += "You can be reached at " + email.getText();
}
order.setText(orderStr);
We
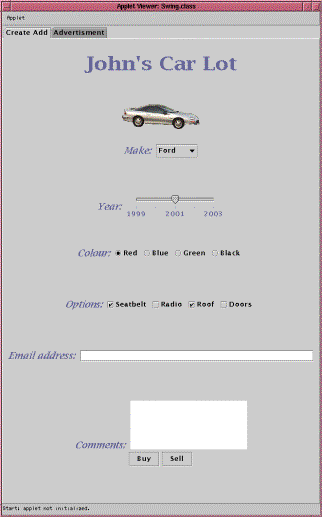
are finially done the Swing version of the applet:
Conclusion
And so ends this
overview of AWT and Swing. As you can see, Swing makes it quite trivial to add
increased functionality to you applet and makes some tasks which were
challanging in AWT easy.