Lab 5 - Dynamic Memory Allocation
due on Sunday October 27, 2024 at 23:59 MDT.
Submit what you have to GitHub classroom by pushing to your assignment repository. Note that GitHub Classroom's due date is in UTC time zone, not MDT.
Intro
After satisfactory results for replicating existing games last week, your new game studio (name pending) begins work on their first ambitious game. You aspire to make the most grand, open world, story driven, massively multiplayer, epic action adventure experience, with memorable and engaging character development, and where your choices matter. To keep track of those choices and the relationship between hundreds of thousands of characters and factions, you call on your contacts from your research days, who advise you to turn to graph theory.
In this lab, you will be implementing a graph in C that can handle many types of operations.
Graphs
Graphs are a common data structure, which you will learn much about in CMPUT 204. Graphs consist of a set of nodes, which can be connected to other nodes by edges.
Each node has a unique ID used to identify it. In this lab, each ID is a non-negative integer.
An edge is a connection from one node to another. In this lab, each edge should store 3 pieces of information:
- The source node ID
- The destination node ID
- Weight
You will be working with directed graphs, meaning each edge is strictly one-directional. We are also working with
weighted graphs, meaning each edge has a weight value. In this lab, all weights will be integers
Input specifications are given in a later section.
Graph Representation
In general, there are two possiblilities for keeping track of edges:
- Adjacency List: A collection of nodes where each node is associated with a list of its neighboring nodes, along with the weights of the edges that connect them
- Adjacency Matrix: A square matrix (2D array) where each cell at row
iand columnjholds the weight of the edge between nodeiand nodej, or0if no edge exists.
The adjacency matrix approach is far simpler to implement, and faster to access. However, when we have a huge number of nodes, but the majority only have a few connections, the memory usage can be prohibitively expensive. Let's compare both methods:
- Adjacency
List: Each node ID is represented as a 32-bit (4 byte) integer, and a 64-bit (8 byte) pointer to its sublist, with a 4 byte integer storing either the length of the sublist, or a terminating character. For
- Adjacency Matrix: If we represent each edge as 1 integer
(the weight) in an
Obviously, we will be using the list approach. Since you do not know in advance how many edges a node will have at any given time, you must
use dynamic memory allocation. To make things easier, we guarantee the node IDs will be between
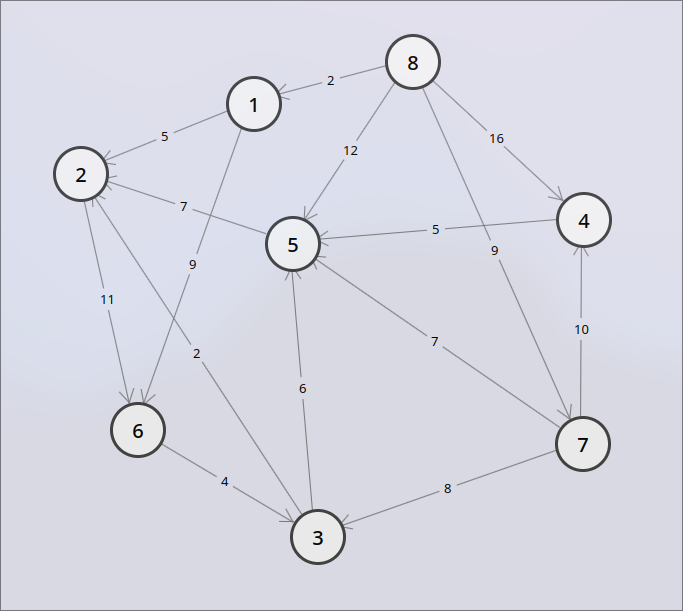
Adjacency list example:
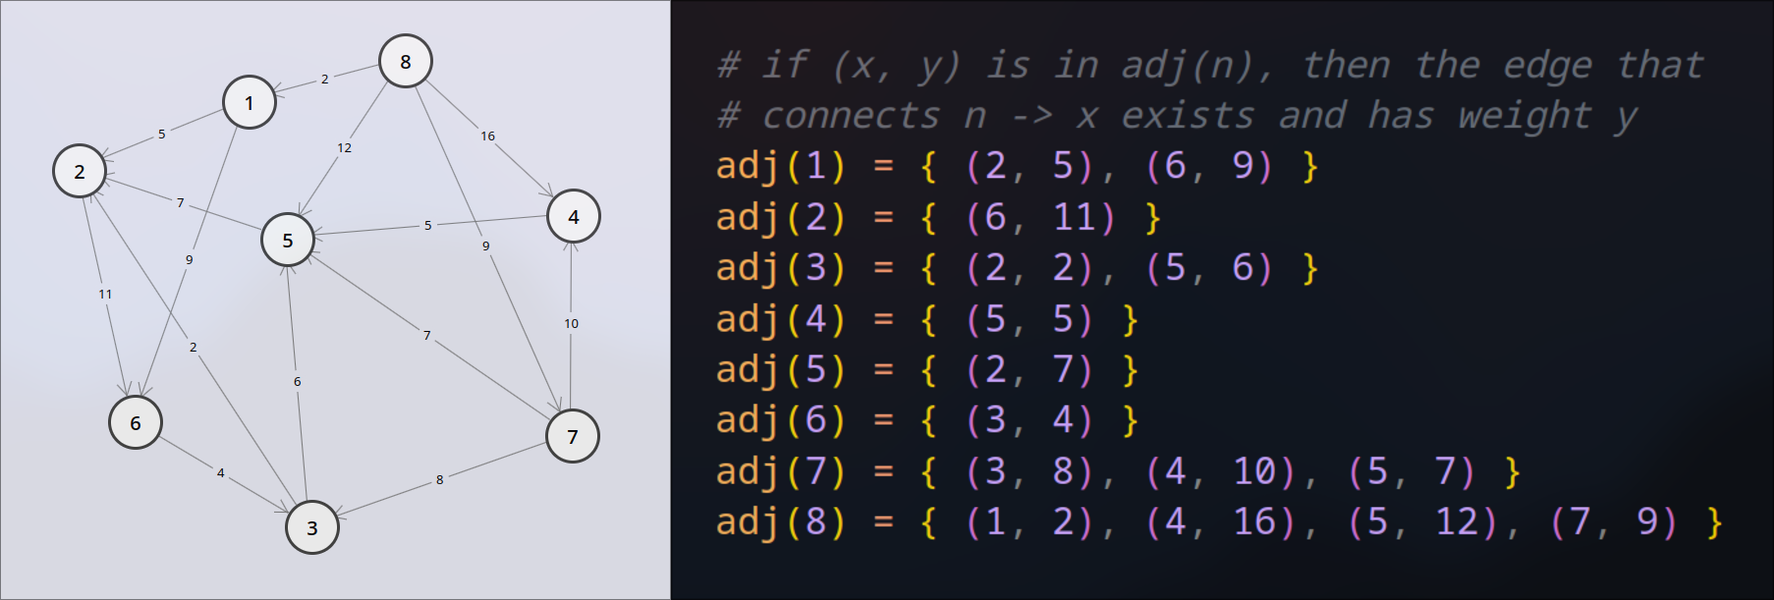
Note: The above representation is purely visual. You may represent adjacency lists as 2D arrays, parallel arrays, etc. However, your representation must use dynamic arrays.
Input
The input will be given through file redirection just as previous labs. It will contain an untedermined
number of lines, each of which is a command representing an operation acting on a graph. The input terminates on a termination command t.
The operations described by the commands have the ability to create and delete edges and nodes, they can check if a node or edge exists, an they can even traverse the graph.
Apart from carrying out the appropriate task, your program should provide one
output for each command (except for the program termination command t). The output should be written to stdout.
Below we specify each command's structure, the task your program should carry out when provided with the command, and the output your program should give.
It is safe to assume that all input given will be one of these commands.
Checking if a node exists:
- Command:
n <id> - Task: Check if
the node with ID
idexists in the graph. - Output:
1if the node exists,0otherwise.
Checking if an edge exists:
- Command:
e <source_id> <dest_id> - Task: Check if the edge connecting
sourcetodestexists in the graph. Wheresourceanddesthave IDssource_idanddest_idrespectively. Bothsourceanddestmust also exist. - Output:
1if the edge exists,0otherwise.
Inserting a node:
- Command:
i <id> - Task: Insert a node with ID
idinto the graph if it doesn't already exist. - Output:
1if the node was added successfully,0if the a node with IDidalready existed in the graph.
Inserting or updating an edge:
- Command:
l <source_id> <dest_id> <weight> - Task: Add an edge with weight
weightconnectingsourcetodest. Wheresourceanddesthave IDssource_idanddest_idrespectively. If the edge already exist in the graph, then update its weight. - Output:
1the edge was added or updated successfully,0otherwise. - Note: An edge cannot be added if
sourceordestdon't exist. An edge should not be added ifsourceequalsdest, i.e. an node cannot be connected to itself.
Removing an edge:
- Command:
r <source_id> <dest_id> - Task: Remove the edge connecting
sourcetodestif it exists. Wheresourceanddesthave IDssource_idanddest_idrespectively. - Output:
1if the edge existed and the removal was successful,0if the edge did not exist.
Removing a node:
- Command:
d <id> - Task: Remove
node with ID
idfrom the graph if it exists. On removal, you must also remove all edges leading to and from this node. - Output:
1if the node existed and the removal was successful,0if the node did not exist.
Traversing a path:
- Command:
p <id_1> <id_2> ... <id_K> - Arguments: Assume
Kis at least - Task: Traverse the path made by the edges linking
node_1tonode_2,node_2tonode_3, ...,node_K-1tonode_K, adding up all the edge weights if they all exist. Wherenode_Xhas IDid_X. - Output: The sum of the weights of the edges traversed as an integer.
-1if the path does not exist. A path does not exist when at least one of the expected edges or nodes is missing.
Terminating the program:
- Command:
t - Task: Terminate the program, freeing all allocated memory. 50% marks will be deducted for any memory leaks on every mark case.
- Output: N/A
Each parameter enclosed in <> above is an integer that can be stored using
int in the lab machines.
You can assume that each integer corresponding to a node ID in the input will be non-negative, and that each integer corresponding to an edge weight in the
input will be
You can also assume that each line will be one of the
above commands in the correct format, and that t will always be at the end.
Implementation
This lab provides you with
Graph
The way the graph is represented is up to you. However, make sure that it can be accessed globally since it will need to be updated and read throughout your program.
As a reminder, here is everything your graph should store:
Every node ID.
Every edge, where each edge should store
- Source node ID
- Destination node ID
- Weight
The graph will be frequently expanded and shrunk to undetermined sizes, this is why your implementation should be dynamic.
Expect that the representation may use multiple arrays, single or two-dimensional. However the exact implementation is up to you.
Graph Operations
The first t).
Each function should carry out the task specified by its corresponding command, as well as return the correct output value. Check the input section to view the task and output value of each command.
Here are the prototypes given for command handling:
int nodeExists(int id);int edgeExists(int source_id, int dest_id);int insertNode(int id);int insertEdge(int source_id, int dest_id, int weight);int removeEdge(int source_id, int dest_id);int removeNode(int id);int path(int source_d);The following table shows which function corresponds to which command
| Function Name | Command |
|---|---|
nodeExists | n |
edgeExists | e |
insertNode | i |
insertEdge | l |
removeEdge | r |
removeNode | d |
path | p |
The
order of the argument are the same for each function and their corresponding command. However, path is the exception. It is only given the first of an undetermined number of node IDs.
Starting and Ending Functions
You're also provided with
xxxxxxxxxxvoid start();void end();start will run once before anything else. end will run once right before
the program successfully terminates, that is, end is called right before return 0; in the main function.
DO NOT EDIT OR CHANGE THE DECLARATION OF ANY OF THE 9 FUNCTIONS IN ANY WAY, they will be used to test and mark your lab. Any changes made and your program will fail to be tested or graded. However, you may (and are encouraged to) implement functions of your own.
Input Handling
The purpose of this lab is for you to get comfortable with memory allocation. For this reason, you won't need to
worry about input handling in this lab (except for the path implementation).
You are given a working input loop that will:
- Read input from
stdin. - Identify each command and its arguments.
- Call the function corresponding to the given command with the correct arguments.
- Write the
function's return value to
stdout. - Terminate when encoutering the program termination command.
This means that you will just need to implement the functions described above, nothing else. The given input loop will identify each command and write output.
Example I/O
Example 1
Input:
xxxxxxxxxxi
3i 5l 3 5 4i 4l 4 3 3i 2l 2 4 3i 1l 5 1 5p 2 4 3 5 1t
Output:
xxxxxxxxxx11111111115
Visual:
Example 2
Input:
i 1i 2i 3l 1 2
1l 2 3 2l 3 4 3p 1 2 3d 2p 1 2
3t
Output:
11111031-1
Example 3
Input:
i 1e 1 2i 4d 3n 4l 4 1 5i 5p 4
1d 4l 1 5 1n 4i 9p 4 1
5l 5 9 10p 1 5 9r 1 5e 1 5p 5
9t
Output:
101011151101-11111010
Memory Leaks and Valgrind
As stated above, your program should terminate without any memory leaks. Leaking memory will cost you marks for this lab (details in the marking scheme section). To check for memory leaks, you will use Valgrind.
Valgrind is a tool that will help you spot any memory leaks in a program. To use it, simply run valgrind
<command> where <command> will is the command used to execute your program.
Example
If you compile your program in this
way: gcc -Wall -Werror -std=c99 src/ex5q1.c -o src/ex5q1. Then instead of running the executable by using ./src/ex5q1, you instead will run valgrind ./src/ex5q1.
In order to determine whether your program leaked any memory or not, check the Valgrind summary section which is printer after the program finished running. It should look something like this:
xxxxxxxxxx...==3820== HEAP SUMMARY:==3820== in use at exit: 0 bytes in 0 blocks==3820== total heap usage: 1 allocs, 1 frees, 40 bytes allocated==3820====3820== All heap blocks were freed -- no leaks are possible==3820====3820== For lists of detected and suppressed errors, rerun with: -s==3820== ERROR SUMMARY: 0 errors from 0 contexts (suppressed: 0 from 0)
If HEAP SUMMARY reports in use at exit: 0 bytes in 0 blocks (like the example above), then you are NOT leaking any memory.
If HEAP SUMMARY reports in use at exit: X bytes in Y blocks where X or Y are not 0, then you are leaking memory.
Ignore LEAK SUMMARY if it shows up, only worry about HEAP SUMMARY for this lab.
If Valgrind reports any error messages during the execution of your program, then you can find out what they mean and how to fix them in the Valgrind error messages documentation. Being able to read these error messages will make debugging your code for memory leaks much easier.
Checking
As always: You are provided with a script that checks your program named check.sh, this script will compare your program's output to the expected output. To pass check.sh, your program's output should be an exact match to the expected output for all inputs given. All of the test cases that check.sh takes into account are provided in the Testcases directory.
In order to run this script first run this command to grant it proper permissions:
chmod 700 check.sh
Then to run the script run the command:
./check.sh
Read the output for more details should you fail any test cases or fail compilation.
You are guaranteed a 50% minimum on this lab if you pass this script.
Important: Make sure all your source code is inside of the source directory src and all files are named appropriately (ex5q1.c, ex5q2.c, etc.).
Note: check.sh will fail on any memory leaks.
Marking (20 pts)
If check.sh passes:
- Pass
check.sh(10 pts). - Pass mark cases (10 pts).
If check.sh fails:
- Pass mark cases (20 pts).
Memory Leaks:
- If your program passes a mark case but leaks memory, 50% of the points that mark case is worth will be deducted.
//End of lab description @CMPUT201 Fall 2024 Teaching team, 2024-2027